• Please review our updated Terms and Rules here

A major breakthrough in removing yellowing from old cases!!!

Status
Not open for further replies.
So far, we haven't found any parts that have "overcooked".

Plastic parts are pigmented and the peroxide won't bleach the pigment as it's encapsulated in the plastic.

If the part was intended to be white, it may eventually get there, however I can't guarantee that you will get to "as new". Some Amiga keys that were cleaned turned grey instead of the slightly brown shade we normally see, but I suspect that Commodore intended them to be grey originally and that they slightly discoloured during the moulding process.

Eventually, the peroxide solution will deplete, it may take a couple of days though. You should be able to treat a couple of batches of parts before it loses it's power.

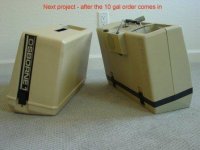
I can't wait to see the pictures....
 
Carlsson: don't worry - in all the phone calls I've made trying to locate the hydrogen peroxide, and when I went to buy it, I make sure I tell them exactly what I'm planning on doing. They still think I'm a little crazy, but I figure it's better to tell them, than have the cops show up at my door, looking for body parts or something !!!!

Merlin: The Osborne case has a sticker on both sides. I'm not sure I want to take it off because I don't know that it would ever look the same after I stuck it back on. The sticker is black and what is suppoed to be the same color as the case (but the sticker has yellowed too). What do you think? Dump the whole thing in and see what happens? I was even thinking of covering the sticker with Vaseline or axle grease or something else, but then parts of the stiker would still be yellow. Any ideas?

I'll pull the parts out at 1 PM PST (that'll have been 24 hours), will take the "after" photos, and will then post them. It looks real good so far.
 
Take a high-resolution photograph of the sticker. That way, if it was destroyed you could always get a new one printed :)

I am looking forward to seeing the results!
 
OK - how do I upload the photos? I don't have a URL to put them on, and then get them from, so I tried converting them to PDF and attaching them, but the file sizes are still too large for this forum.

I can email them to someone, if they have a way to get them onto the post.
 
Can you put them onto Photobucket (or something like that) and post a link to them on here?

Hang on, reply here, click "Go Advanced" and it should allow you to post the images.
 
OK - I think I've got it.
I had to compress the files, so I hope they're still readable.
I'm also emailing them to someone else who sent me a PM, in case this way doesn't work.
Merlin: Where the hell is "Go Advanced"? I must be backward - I can find it.

Maximum of five files allowed.

I post two others in the next reply.
 

Attachments

  • Compressed - Before - outside of panel.jpg
    Compressed - Before - outside of panel.jpg
    19.5 KB · Views: 1
  • Compressed - Sunshine.jpg
    Compressed - Sunshine.jpg
    13.1 KB · Views: 1
  • Compressed - Half Baked - 3 hours.jpg
    Compressed - Half Baked - 3 hours.jpg
    33.3 KB · Views: 1
  • Compressed - Bubbles on parts.jpg
    Compressed - Bubbles on parts.jpg
    24.2 KB · Views: 1
  • Compressed - After - comparison.jpg
    Compressed - After - comparison.jpg
    12.5 KB · Views: 1
One more file and my notes from the experiment.


Product used:
Urine Rescue manufactured by Prochem (www.prochem.com)
From MSDS: “Hydrogen peroxide, aqueous solutions with not less than 20% but not more than 40% hydrogen peroxide (stabilized as necessary)”
Cost: $ 21.70/gal


Trial batch:
2 keyboard keys, and a panel from the back of an Osborne 1 (see before photos)


Wed, Sept 3rd

1 pm
Bought 1 gal of Urine Rescue
Outside temp (in shade) = 99 F
Humidity = 20%
Skies = blue skies = lots of UV (see photo)
Took “before photos”
Put 1 quart of Urine Rescue in clear plastic kitchen bowl with lid
Added 1/8 tsp of OxiClean Versatile Stain Remover powder (caused some bubbling action)
Added parts to solution and stirred gently
Note: Osborne keyboard keys tend to float, albeit upside down (so that’s OK)

2 pm
Relieved pressure on lid (transferred from 70F inside, to 99F outside and put in sun, so experienced some expansion. (It looked like the lid was going to blow off any minute).

3 pm
Pulled panel piece out for a look – the outside is now as grey as the inside was (ie: no longer yellowed)
Keyboard keys look better, but not as good as the panel does.
The keys have a smoother finish than the panel, so maybe that makes them take longer
Put pieces back into to solution to cook some more

4 pm
Pulled pieces out for a “during” photo, and put them back in again (parts were in sunlight for 3 hours)
Looked so good, I telephoned and ordered 10 gals of Urine Rescue for the computer cases

6 pm
The keyboard keys are now a grey color, instead of the greenish color they were, before they got cooked. Out of the sunshine as of 6:30 pm.


Thurs, Sept 4th

6 am
Outside temp = 80 F
Humidity = 65%
Skies = clear blue
Parts are again in direct sunlight

9 am
Outside temp = 95 F
Humidity = 36%
Photo taken of bubbles on parts – the bubbles were forming throughout the process

12:30 pm
Outside temp = 100 F
Humidity = 32%
Removed parts from solution – they’re done !
Rinsed parts off, and dried them.
Took the “after” photos.
Total time in direct sunlight = 12 hours


Notes:
Observations after the first trial: I noticed that the computer casing seemed to have turned yellow over time, while the grey keyboard keys seemed to have turned a somewhat green color. I originally thought that maybe the keys hadn’t changed color, and the green and grey were meant to go together. That is apparently not the case. They are just two different shades of grey, and the darker grey turned green over the years, while the lighter grey turned yellow.

I’m not sure whether the great results are due to the amount of sunlight (UV), the temperature, or the concentration of hydrogen peroxide, (or any combination of the three) but it sure works for me !
 

Attachments

  • Compressed - Next project.jpg
    Compressed - Next project.jpg
    21.8 KB · Views: 1
Fantastic!

That is exactly what I expected, those keys were originally grey like the Amiga keys were; but, just like Amiga keys, they had gone that funny off-brown colour. That case was originally grey in my opinion and the cleaned one looks brilliant.

That is proof indeed that we have cracked the process once and for all.....it is repeatable. The magic ingredient is the "Oxy" as it catalyses the peroxide reaction (don't ask me to explain it, I'll be here all night LOL).

Once you have cleaned all of it, clear coat the parts with an acrylic lacquer to prevent them from yellowing again.
 
Last edited:
Merlin: yeah - I think it looks great. Now what about my "sticker" dilemma? (see reply at top of page 5)

PS: you started this whole post - thank you very much - I wouldn't have been able to do this, if you hadn't started it and provided lot's of assistance as well.
 
Lorne,

The stickers will have been stuck on with a solvent glue, so they should be OK and won't come off. The process should remove the yellowing from the sticker without any problems.

:mrgreen:
 
Last edited:
Yes, the stickers should be fine and painted logos, badges etc. are also not affected by the process. The pigment in the paint is encapsulated in the resin so it won't react.
 
Update:

I've now done three batches of keyboard keys, from my three Osbornes (a 1, & two 1a's). I'm getting slightly differing results. It seems temperature has a lot to do with the results. The other part of the equation seems to be the amount of Oxy powder used. I'm starting to get the hang of what works best. I've got the three cases to do yet, and will post the results after they're done.

Two of the cases have leather carry handles, pop rivited (or better) to the plastic. I'm going to have to drill those out, and pop rivet them back on after the process, because I noticed that the hydrogen peroxide solution has bleached my wooden, paint type stir stick, and I'm sure it would do the same to the leather.
 
I got a strange result on one of my space bars (from the Osborne 1 - the 1a's were fine). From the top of the spacebar, you can almost see the two "ribs" on the inside, and what appears to have been a stress fracture or a manufacturing defect in the plastic when it was formed. (whitish lines through the grey plastic - see attached pic). The rest of the keys came out fine.
 

Attachments

  • Space bar.jpg
    Space bar.jpg
    34.2 KB · Views: 1
Those are definitely stress marks in the plastic, probably by years of use or by something heavy being placed on the keyboard. You may have to resort to a respray of the space bar to match it up to the new colour of the keys.

At least there are no letters on the space bar, it could have been worse....

:D
 
Another Update:

I processed my last batch of keys today.
Started at 6:30 am, and they were done by 3 pm. (ie: 8 1/2 hours)
This time, I put the clear plastic tub containing the parts, on a glass topped patio table that is out in the open, so they get UV from 360 degrees.
I used the same solution that I'd used for two other batches, and just added a little more Oxy.
Got some real good foaming going today (a little more, and the fire dep't WOULD have been proud of me).

Yesterday, I was pulling the parts out of the tub, and was wearing one of those doctor's latex gloves. It was somewhat painful, so today I thought I'd check the temp of the solution. It was 103 F outside, and the solution, sitting in the sun, was 146 F. No wonder it hurt. Yesterday, I was apparantly reheating my hand, like some old beef stew from the fridge. Now I use a slotted spoon. I think heat has a lot to do with this de-yellowing process.(Tidbit - the sun heating that solution is also why lots of people in Phoenix, AZ have chillers for their swimming pools - you can't take a quick dip to cool off on a hot day, when the pool water is 140 F).

Check out the attached photo. I have two Osborne 1a's. When I was reassembling the keyboards, I noticed that one was a real dark grey (almost black) and the other was more of a real dark blue. I turned the blacker keyboard upside down (to see the part that is inside the case and never sees the light of day), and low and behold, it's blue on the underside. It seems that the blue has "yellowed" to a black. I'm going to process those black parts too, and see if they come back to blue. I see no reason that shouldn't happen.

Another tidbit: with all this keyboard reassembling work, I noticed that my Osborne 1 has an Alpha Lock key, one of my Osborne 1a's has an Alpha Lock key, and my other Osborne 1a has a Caps Lock key. The one with the Caps Lock key is the one with the bluer keyboard, an was built or shipped Oct 29, 1982 (I've got the original box and packaging for that one), so I suspect they must have changed the terminology at some point. I wonder what other keyboards had at various times. That's probably something for another post.
 

Attachments

  • The case of black & blue.jpg
    The case of black & blue.jpg
    29.3 KB · Views: 1
WARNING RE: STICKERS

Some stickers apparantly don't make it through the de-yellowing process.

There were two stickers on my after market "OsCool" fan (see attached pic).
One was a foil backed sticker that had some blue printing (ink I presume) with the distributor's name and address on it, and another was a paper sticker with the OsCool name/logo on it. The blue printing on the foil sticker disintegrated, and the paper backed sticker was bleached white and came off like wet paper towel would. The foil sticker is still stuck on good, but it's just a piece of foil now.

Neither of these are any big deal, as they weren't that good looking anyway. I'm going to see what happens when I do the face plate of the Osborne 1a. It's got a sticker stating: "WARNING NO USER SERVICEABLE PARTS". It should probably now read: "Only user serviceable parts". It looks like a foil backed sticker. If that one disintegrates, I'll pull them all off, before I process any other parts.
 

Attachments

  • OsCool fan sticker.jpg
    OsCool fan sticker.jpg
    85.5 KB · Views: 1
Holy Moly!!

With temperatures reaching 140F (about 60C if memory serves) you will need to maybe watch for distortion of smaller plastic parts due to the heat.

So that's why backyard swimming pools always seem to be deserted, they are hot enough to make stew in!!!

LOL
 
Status
Not open for further replies.
Back
Top