• Please review our updated Terms and Rules here

Another Tandon TM100-2A Issue

Tincanalley

Experienced Member
Joined
Aug 26, 2019
Messages
176
Location
Los Angeles, CA
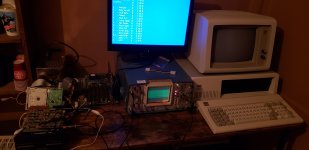
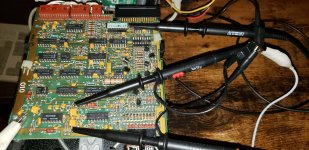
I am on my last repair of a batch of drives. All other cleaning and repairs went perfectly and I now have 5 drives. However, the 6th one is being a pain. I cleaned it up, silicone oiled all rails and spindle bearing. The carriage moves back as smoothly as the stepper motor will let it (those steps make for a bumpy travel). It moves as easily as all my other drives, so I'm assuming the stepper doesn't need lube. However, the carriage does some odd things and I don't know if it's the controller board or the motor, or????

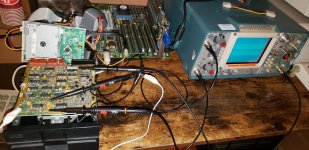
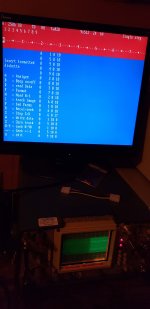
I used IMD and at first things seem to be out of alignment, but I accidentally put it on double step. When I changed that, I was able to step through all the tracks, zero it, step the tracks again, over and over. The speed as also correct. That's when I decided to format it with the program. It formatted quickly and very quiet. I then tested it again and it read all the tracks and changed perfectly from 0-39. That's when I decided to exit to DOS and copy some file to it. That's when things went wrong. It copy a copy files copied and then couldn't find the sector. I tried to read it, and nope. I then used IMD again, but this time it was only showing track 39. I tried to return to track 0, but it still showed 39. I looked at the carriage and when I tried to zero it, it didn't move. When I tried to go to track 40, it just moved back and forth about 1/8th an inch and stopped. So I took it apart again and when I moved it by hand, it was fine. There was no sign of it being stuck or hard to move.

So that's where I am. Not sure if it is with electronics or mechanical. Also, of all the drives I have, why does this one make a knock when it move back to track 0? By hand or stepper, it knocks when it hits the set screw on the back of the case. Is there something missing? A rubber piece? It's odd and very annoying seeing as how everything else on the drive is almost silent
 
Okay, I remembered I had another controller board, so I swapped it. It seems to be moving the carriage just fine now. I was able to format, write, test and step through the tracks. Then I took the disk to my 5150 and it wouldn't read the disk. I used the 5150 to format and copied some files to the disk. I then took that to the drive in question and it wouldn't read it. Using IMD I found that it isn't on track 0, but off by 2 tracks. I have to step up two tracks to show track 0. I looked at all adjustment screws and they are still glued in place, so have no idea how the carriage is off by 2 tracks. Would a bad track 0 switch cause this kind of issue, or is this something that has to be a physical adjustment issue?

I think I need to get out my scope for this one as the SM uses one for diag and adjustment.
 
Tincanalley,
If you unplug the two read heads, and swing the logic board out of the way, you can see the head carriage assembly.
Look at the hub for the Taunt Band. It has a socket head screw and has likely slipped a bit. I snug these up a
little if I am going over the drive for the first time. Be careful to not over tighten the hex head screw. If you know
where track 0 is really located on the floppy, you can loosen the Hub and carefully move the head carriage assembly,
while it is loose from the motor shaft to get it back to track zero.

Larry
 
I checked the screw holding the band to the spindle and it is tight. There is no slippage.

I think it is time to bring out the scope and go over the procedures in the SM, but I can't find my lead for the external trigger. I will do some more searching for it and buy a new one if I can't find it. Odd how that's the only lead I can't find, but that's the way things go.
 
Okay, I have verified that the track zero switch is working properly. As it stands now, I am off by one track. When on zero, it reads nothing. When moved to track one, it reads as zero. If I move to track forty, it reads as track 39.

So, if the track zero switch is engaging as intended, and the end stop picks up the area just before track zero, do I move it to track one so it is reading track 0 and then adjust the stop screw so it engages the transport. Will this work as long as the track zero switch is still engaged when moved to this position? If it doesn't, then I need to adjust the switch as well?

I'm so close, but don't want to take the wrong step and make it worse.
 
So, what you are telling us is the Head is misplaced when trying to read track 0, and the track zero switch is functional.
I'd think at some point the bolt on the Hub came loose enough to let the motor shaft slip enough to misplace the head
assembly by one track.

If I were doing the work I'd step the carriage to track 1, which means it is reading track 0. Then somehow fix the head
carriage assembly so it can not move in either direction. Then I'd loosen the hub screw that would let the motor shaft
move, and step the motor one track. Now the motor is once again aligned to the point that you previously read track 0
but was actually previously track 1. Then tighten the Hub screw, but not so much as to over tighten it.

Does this make sense?

Larry
It makes sense, but won't it still go back past track 0 if the carriage doesn't hit the stop screw? The track zero switch isn't very accurate as it is just a simple switch that is actuated by the arm of the carriage. I'd say from the time edge of the arm touches it, there is another 1/8" travel over it, so that's where the stop screw comes in. Once you are on track 0, and the switch is actuated, then the set screw is set to stop the carriage from traveling back past 0.

Doesn't the stepper motor rotate 360? If so, then it doesn't matter where the motor is as it counts based on the track zero switch, right?

So all of this situation just seem odd to me as the stop screw still has the factory glue on it as to all other screws meant for adjustment. So how is the carriage moving one step back past how it was set at the factory?
 
It seems like when I was working on these (and I could be thinking of a different drive) that the track 0 sensor wasn't all it needed to determine track 0. Essentially the switch is not nearly sensitive enough to discern between track 1 and track 0 and it was the combination of the track 0 sensors AND the polarity of the stepper motor which had four positions. So it was track 0 AND stepper position 0.
 
It seems like when I was working on these (and I could be thinking of a different drive) that the track 0 sensor wasn't all it needed to determine track 0. Essentially the switch is not nearly sensitive enough to discern between track 1 and track 0 and it was the combination of the track 0 sensors AND the polarity of the stepper motor which had four positions. So it was track 0 AND stepper position 0.
According to the SM, you test the track 0 switch by checking voltage on an IC pin while on track 1 and then track 2. If you don't get the voltages noted, you adjust it by going to track 1 and adjusting the switch position until you do get the voltages. I will try that, but since I know the drive is off by one track, I'm going to try the second part of track 0 adjustment. I will paste the procedure from the SM below. It says to do this procedure if it steps a track lower than 0, and that's what I'm dealing with.

5.10 TRACK 0 STOP
ADJUSTMENT

The Track 0 stop screw should be adjusted after
the Cats Eye pattern has been adjusted, or when
the carriage seeks to a track lower than Track 0.

1. Set up the oscilloscope:
Channel A: Test Point 1
Channel B: Test Point 2
Ground: Test Point 10
Read Differentially: A plus B, B inverted
Time Base: 20 milliseconds per division
External Trigger: Test Point 7
2. Apply power to the drive.
3. Select the drive.
4. Insert an alignment diskette.
5. Turn the Track 0 stop screw counterclockwise
two turns with a 0.050-inch
Allen wrench or a number one Phillips
screwdriver <Figure 5-13).
6. Step the carriage to Track 0, and observe
the waveform.
7. Slowly tum the screw clockwise until
the output amplitude begins to decrease
on the oscilloscope.
B. Turn it counterclockwise until the amplitude
stops increasing.
9. Turn it counterclockwise an additional
l/8th turn.
 
Okay, making some progress. While I don't have an alignment disk, I know that IMD reading a valid track should be viewable with a scope. I set up both channels and the trigger as set in the SM. I was able to see both channels, with channel 2 inverted. When I move to track 0, that is actually farther back than the actual track 0, the amplitude decreases. When I move to the next track, IMD shows track 0 while it is set to track 1. I then moved to a number of different tracks and all valid tracks have a decent amplitude and this is close to the cat's eye pattern you would see with the alignment disk. So I know from the scope that my alignment is good. Now I need to set the scope to read voltage on one of the IC pins so I can adjust the track 0 stop screw. If It works as the SM states, I should be able to have it stop again on track 0 and the drive should be good to go. I'm attaching a few pics.

In the third pic I switch from track 1 to track 0. When on track 1 it sees 0 and there are no errors. When I switch to track 0, it is all errors as it is back beyond the real track. You can see the error start in the last few entries.
 

Attachments

  • Tandon Scope 1.jpg
    Tandon Scope 1.jpg
    673.6 KB · Views: 10
  • Tandon Scope 2.jpg
    Tandon Scope 2.jpg
    720.6 KB · Views: 10
  • Tandon Scope 4.jpg
    Tandon Scope 4.jpg
    436.5 KB · Views: 9
  • Tandon Scope 5.jpg
    Tandon Scope 5.jpg
    893.5 KB · Views: 10
Okay, I tested the track 0 switch and I believe it to be good. The SM isn't too clear about voltages, as far as max. It says to test on track 1 for at least 2.5V. I tested at 5V and I'm assuming that is okay as it said, "at least 2.5V". Also, it says that on track 2 it should be less than 0.8V and I got just under .3V.

So if the switch is working, and positioned properly, based on the alignment test of IMD, how the hell does it travel back past track 0 when none of the screws set at the factor have been moved (glue on all)? My next step is to adjust the track 0 stop screw to keep it from travelling back beyond track 0. If I can get that done, the drive should work perfectly.
 
Okay, I'll throw my two cents' worth in here, no matter what I think of Tandon floppy drives.

How are you adjusting the Track 00 stop screw? Properly adjusted, it should be impossible to step outwards beyond Track 0. See pages 2-6 and 2-7 here.
 
Okay, I'll throw my two cents' worth in here, no matter what I think of Tandon floppy drives.

How are you adjusting the Track 00 stop screw? Properly adjusted, it should be impossible to step outwards beyond Track 0. See pages 2-6 and 2-7 here.
I have not adjusted it yet. It is still factory set and glued. The puzzle is, how does it track one step beyond track 0 if it is still set from factory... I have used factory formatted disks, disks formatted in another Tandon drive and disk formatted in an IBM external 360K drive. All fail to find track 0, so I used IMD to troubleshoot. In IMD, track 0 reads errors, but moving to track on shows up as track 0 and has no errors. On the other end, track 40 shows up as track 39. So it is off by one track. Since the track 0 switch tested okay as tested from the SM, it is the stop screw that needs adjustment.

This drive makes a loud knock when it goes to track 0. That means it is hitting the frame of the drive as if it were hitting the small stop screw, it wouldn't make such a sound. So this is where I am, and why I'm so confused as to how it got this way. Maybe the tip of the stop screw broke off (manufacturing defect, etc.).
 
If I look at my TM-100s (they're all -4 and -4Ms, so 96 and 100 tpi), I note that the positioner steppers are slightly rotated on their mounts--each a bit different. Did you perhaps remove the stepper module from the drive while servicing it? You might be able to tweak the exact position of the steps by loosening the nut attaching the stepper to the module and rotating it slightly. If you're confused, I can snap a photo or two...
 
It seems like when I was working on these (and I could be thinking of a different drive) that the track 0 sensor wasn't all it needed to determine track 0. Essentially the switch is not nearly sensitive enough to discern between track 1 and track 0 and it was the combination of the track 0 sensors AND the polarity of the stepper motor which had four positions. So it was track 0 AND stepper position 0.
I am seeing something like that in the 'OEM OPERATING AND SERVICE MANUAL TM100-l, TM100-2 DISK DRIVES 48 TRACKS PER INCH' manual - the track 0 switch is only part of what generates the TRACK 0 signal sent from the TM100 drive to controller.

On page 5-12 of the aforementioned document is the '5.9 TRACK 0 SWITCH CHECK AND ADJUSTMENT' procedure. In that, the physical position of the track 0 switch is set so that the switch switches states between tracks 1 and 2 (not 0 and 1). So to be technically correct, in the TM100, the switch should really be called the 'tracks 0 and 1 switch'.

(BTW. In that procedure, what is being monitored is the output of a TTL gate, and so I would use a TTL logic probe rather than looking for "less than 0.8 volt" and "at least 2.5 volts".)

The circuit diagram shows that the TRACK 0 signal sent by the drive to controller is created by AND'ing the following:
- switch state (i.e. HIGH for 'I am on either track 0 or track 1'); and
- a signal that is representative of stepper motor position.
 
Okay, so here's where I am. I gave up with the track 0 switch and stop screw. Didn't help at all. So I decided that the only other thing is the radial alignment. So I loosened the screws, hooked up the scope and went about adjusting for signal. With out the alignment disk, this is so easy, but with the scope and the readings from IMD, I was able to get it reading all tracks, error free. I then did the track 0 switch and stop. It now reads factory formatted disks and one I made in my 5150. I formatted a disk and will try in the 5150 tomorrow.
 
Okay, I'm the idiot. I did have it fixed, but I forgot to tighten the screws to lock the radial alignment in place. It drifted, so I readjusted and locked them down. I was able to format, write and read from the drive. Of course I still need to test it in another drive, but I'm confident as it reads disks formatted in the 5150 and new factory formatted.

I hope this drama is over. I like the idea of having 3 spares.
 
Good work! I did something similar trying to allign a teac 55gfr a few nights ago. You live and you learn. Upside at least you learned something new. :)
 
Back
Top