• Please review our updated Terms and Rules here

Anyone know how to take a VR201 apart?

DougIngraham

Veteran Member
Joined
Oct 2, 2019
Messages
656
Location
Rapid City, SD USA
I bought a VR201 off of EBay for my recently acquired DECmate II. When the monitor arrived it had a brown liquid around the seam at the front of the case. I can't tell what it is but I am not going to power it up until I have cleaned it out thoroughly. The whole thing reeks of cigarettes. The problem is I can't figure out how to take the cover off. There are two screws on the bottom which it appears to be a mistake to remove. They hold the leveling pin mechanism in place and when you remove them the leveling mechanism sort of falls into the case.

There appear to be the main part of the case and a part that attaches around the front holding the CRT in place. There are two slots on the left and right sides which look like they are for prying but if they are then stuff is stuck together inside and I am not willing to apply enough force to break something.

Is there a trick to getting these apart?

Thanks!
 
I guess it takes a certain level of frustration to post a question like this and after posting I looked at it again and figured it out.

Oh, you want to know how to do it?

On the back of the Monitor is a round recessed white cap. There is almost no clearance around it which explains why I didn't immediately pry it off and remove the Phillips screw underneath it. After that you can place it monitor face down on a table and gently rock the cover off.

Apart from the ancient cigarette smell and the brown juice around the bezel it doesn't look too bad.

Will clean it up and do a search to see if anyone has come up with a magic way to restore the yellowed plastic to something less offensive. If not then there is always paint.
 
Like you I found out the hard way how to take a VR201 apart. Did the same and had the leveling stuff fell inside. Eventually I got it all back together.
 
In my experience the brown juice is due to the glue between the front glas and the CRT is slowly deteriorating. I think it will continue to leak brown juice.

On my VR201 I injected butylacetate in between the front glas and CRT and let it stay there for a week. Then the front glass came off easily. Cleaned off remaining glue.

Not yet reassembled it. But planning to add a sheet of Lexan or similar instead of the glue.
 
I've cleaned the main part of the case pretty well at this point. The case is very yellow so I am going to try the UV only approach of whitening by placing it in the sun for a few days.

I am not sure what I am going to do about the glue layer between the glass and the screen face. From what I have read the glue used is believed to be PVA which dissolves in hot water. That seems pretty safe.

As for putting it back together, if my vacuum chamber was just a little bit larger I would probably degas some clear epoxy resin and then paint the front of the crt and the back of the glass. Put it together and then place the whole thing in the vac chamber until it cures. This will prevent any gas bubbles between the glass layers. But epoxy is pretty one shot and there would be no do overs in the event it didn't turn out well. And my vacuum chamber is not big enough.

Replacing the glass with a poly carbonate sheet is probably better overall protection against a breakage event. The glass transition temperature of poly carbonate is 147 C (297 F) with the melting point only 8 degrees higher at 155 C (311 F). This is a narrow range. If I do this I would cut the poly sheet roughly to size and place the tube face up in my oven with the poly sheet on top. Set oven temp to around 125 C (257 F) to start and let everything stabilize for half an hour. Slowly advance the temp a few degrees at a time until the plastic drapes over the face of the CRT. Turn off the oven and wait until cool. Trim to final fit and assemble.
 
I am not sure what I am going to do about the glue layer between the glass and the screen face. From what I have read the glue used is believed to be PVA which dissolves in hot water. That seems pretty safe.

Please be careful with applying heat to a CRT. I've written my view about it on the forum.
http://www.vcfed.org/forum/showthread.php?72498-CRT-cataract-please-read
The scary part: http://videokarma.org/showthread.php?t=247887

But I had the same issue with a VR201 which was given to me for my Decmate III.
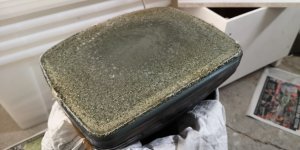
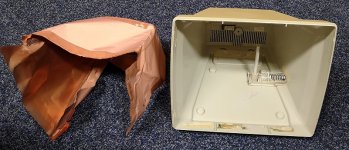
The fluid was also eating the copper in my monitor. So I removed the copper and cleaned
everything and cut out the completely green part... For the CRT I used just a few towels in
a waste bin, hand gloves, face protection, fishing wire and a bit of patience.

IMG_20191117_123732.jpg IMG_20191117_123735.jpg IMG_20191117_125201.jpg IMG_20191117_200947.jpg IMG_20191118_212516.jpg

After that I was rewarded with an ERROR 32... :( I think I don't have the right disk images for this machine.
I cleaned the original floppy drive and swapped it with another. The same error stays...

So please be careful. I think Mattis his method is even saver to do with butylacetate...

Regards, Roland
 
Last edited:
I've cleaned the main part of the case pretty well at this point. The case is very yellow so I am going to try the UV only approach of whitening by placing it in the sun for a few days.

Uh? I think it's the UV that made it yellow in the first place...
But of course, I might be confused.
 
We replaced the PVA with a sheet of LEXAN that was formed to fit behind the outer piece of glass. Had to wait until my wife wasn't home to use the oven to warm the LEXAN. It is probably better protection than the original PVA.
 
Uh? I think it's the UV that made it yellow in the first place...
But of course, I might be confused.

I think there is a lot of confusion around this issue.

http://www.vcfed.org/forum/showthread.php?74204-Retrobright-by-sun-only&highlight=retrobright

Popped up when searching for retrobright.

One of the key points I noticed when researching this is that the most effective
variations all require light. It is not at all clear what kind of light is needed. At this
point I think the hydrogen peroxide serves no purpose but to act as an accelerator
of the reaction. You can soak the part in strong peroxide for days and nothing
happens in the dark. It also appears that you can also apply heat with peroxide
with some effect.

A piece of white tape on top of a yellowed case will show little or no change in color
underneath it. I have not found an example of a piece of transparent tape so this is
not conclusive. The bottoms of cases will change color sometimes to the same
degree as the tops and sides. It is not light in this case that is causing the color
change.

My best guess is that what we are seeing is a chemical reaction between something
in the air and the bromated ABS plastic. I think this because a piece of white or
black tape seems to block the effect almost completely. The tape stops the air from
reaching the surface of the plastic. The plastic will change color even if stored in a
dark room.

I am thinking of applying some flat or semi-gloss automotive clear coat if I can get
the plastic back to the color I want. If I am correct this will block the air from
affecting future color change. Automotive clear coat is formulated to not yellow
although it is still not normally used over white paint. The problem is achieving the
right level of gloss.

I am not trying to make a museum quality representative of a DECmate II here. I
am just looking for a reliable and somewhat portable PDP-8. I thought I had found
this in a small backplane 8/a but when you combine that with an RX01 you have
something that is no longer really portable. And I know you are thinking of SIMH
on a laptop but that is not the same thing. I may find that the DECmate
implementation strays too far from what makes an 8 but SIMH and even my own
emulator is definitely beyond this point.

Thanks for all the comments and suggestions!

Doug
 
We replaced the PVA with a sheet of LEXAN that was formed to fit behind the outer piece of glass. Had to wait until my wife wasn't home to use the oven to warm the LEXAN. It is probably better protection than the original PVA.

I had looked at your blog about this. It was not at all clear what you had ended up doing apart from adding a Lexan sheet.

So you still kept the outer glass? I would have thought the Lexan would have been enough. How thick is that layer of PVA?

Doug
 
So you still kept the outer glass? I would have thought the Lexan would have been enough. How thick is that layer of PVA?Doug

The sheet of LEXAN that we got at Home Depot (Bauhaus for the European people) was just about the same thickness as the original PVA. We put the outer glass on an aluminum foil covered cookie sheet inner side up, laid the LEXAN on top of the inside surface of the outer glass, and slowly increased the temperature of the oven. When it got to 230F the LEXAN got really soft and conformed to the inside surface of the outer glass. We slowly cooled the LEXAN and glass, and then trimmed the edges of the LEXAN to match the outer glass. We reassembled the CRT with the LEXAN replacing the PVA, and the outer glass installed.

I have seen some blogs where they just put some double-sided foam tape between the CRT and the outer glass, and do not replace the PVA. Since the RICM is a public place we didn't want to take the risk of having an interactive display item without some kind of implosion protection.
 
Back
Top