• Please review our updated Terms and Rules here

Attaching DEC Handles, the Right Way

I got the rivet set thing today and chucked it in the drill press. The hole in the table was proving to be problematic, as the rivet needed to be braced firmly from the rear. I used a file to cover the hole, rather than adjust the the table and have to reset it later. That gave the flanges a bit of a textured look. Anyway there's a clear tactile difference between setting the rivet and trying to drive it through the handle, which made the setup fairly easy to use.

One thing that was less easy, is that the newer boards are a little thicker than the DEC boards, and the distance between the ledge in the handle and the holes didn't have any clearance on the board I was using (a Hachtmann serial card which happened to have no handles).

You can see that my skills are sort of meh, but the handles and rivets are set OK.
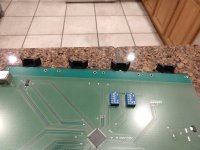
IMG_20221031_234720135.jpgIMG_20221031_182524075.jpg

Is there a reason why the flange side should go on the PCB (component) side? I put it on the handle (solder) side to make it harder to deform the soft plastic of the handle.

Vince

(My board has had the SMT electrolytic replaced by a through hole part soldered into the spare IC's power holes, if anyone wondered why it's missing in the photo.)
 
After test-riveting with a junk PCB and a piece of plastic sheet to stand in for a handle I give up for now. The result was terrible.
Rivets are nice if you have the correct tool for the job. I am waiting for the "Fiskars Eyelet Setters" from Amazon which will arrive by Nov 9. I will see if that tool is capable of doing a better job than what I had until now.
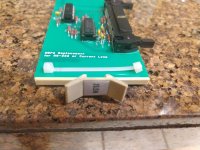
So for now I have adopted Vince's cable tie approach and it works fine and looks not too bad:

IMG_20221101_201211108.jpg
 
I got the rivet set thing today and chucked it in the drill press. The hole in the table was proving to be problematic, as the rivet needed to be braced firmly from the rear. I used a file to cover the hole, rather than adjust the the table and have to reset it later. That gave the flanges a bit of a textured look. Anyway there's a clear tactile difference between setting the rivet and trying to drive it through the handle, which made the setup fairly easy to use.

One thing that was less easy, is that the newer boards are a little thicker than the DEC boards, and the distance between the ledge in the handle and the holes didn't have any clearance on the board I was using (a Hachtmann serial card which happened to have no handles).

You can see that my skills are sort of meh, but the handles and rivets are set OK.
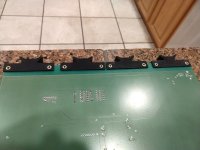
View attachment 1248039View attachment 1248040

Is there a reason why the flange side should go on the PCB (component) side? I put it on the handle (solder) side to make it harder to deform the soft plastic of the handle.

Vince

(My board has had the SMT electrolytic replaced by a through hole part soldered into the spare IC's power holes, if anyone wondered why it's missing in the photo.)
Those shots could have been taken in my Tampa condo kitchen. Same tile, same cabinets, same granite counters. No PDP8 parts though, not yet anyway.
 
Those shots could have been taken in my Tampa condo kitchen. Same tile, same cabinets, same granite counters. No PDP8 parts though, not yet anyway.
Yeah, my wife complains about the grout lines in the countertop. Also, the lip is pretty thick, which has created an issue with replacing the dishwasher.

Still some of the best lighting in the house for a quick cell phone photo, though.

Vince
 
this is fantastic, thank you! i bought a bunch of replacement handles a while back but was struggling with how to get them attached properly, you're a lifesaver :)
 
There are people still using Indestro rivet setting tools for their original purpose, installing new brake linings. Small aircraft still use such brake linings and rivet setting tools are still needed there. Check out the Rapco RA825 rivet set tool. It looks very much like the Indestro #824, but instead of striking the punch with a hammer, you turn a handle to more slowly apply pressure with the punch and spread out the end of the rivet.

Rapco RA825: https://www.rapcoinc.com/brake_rivet_tool.asp
One seller that has the RA825 at $51.25 in stock: https://skysupplyusa.com/brake-rivet-tool-1/
Another vendor at $48.95: https://www.aircraftsupply.com/ra825.html
Another at $43.50: https://www.aircraftspruce.com/catalog/topages/RapcoBrake.php

I have both an Indestro #824 and a Rapco RA825 and aside from the method of applying pressure (striking with a hammer vs turning a handle) they both are extremely similar. But the RA825 is made for installing 5/32" (0.156") diameter tubular rivets and the Indestro #824 is made for slightly smaller 1/8" (0.125") tubular rivets. The M3 tubular rivets Glitch used are 3mm (0.11811") tubular rivets. I don't know if the RA825 is too large to do a good job on 1/8" rivets or on the even smaller diameter M3 rivets.

By the way, M3x5mm tubular brass rivets are very available via eBay and very inexpensive.
Rapco RA825: https://www.rapcoinc.com/brake_rivet_tool.asp One seller that has the RA825 at $51.25 in stock: https://skysupplyusa.com/brake-rivet-tool-1/ Another vendor at $48.95: https://www.aircraftsupply.com/ra825.html Another at $43.50: https://www.aircraftspruce.com/catalog/topages/RapcoBrake.php

These are really good sellers but You missed a seller https://www.airpart.co.uk/
 
Back
Top