• Please review our updated Terms and Rules here

Compaq Deskpro 386/16 Restoration

AndyM1981

Experienced Member
Joined
Mar 15, 2020
Messages
79
Location
Stouffville, Ontario, Canada
Hello All,

This is a thread that I've been hoping to make for a long time now, so hopefully we can all have some fun with it.

I've been searching for a Deskpro 386 for a while now. It's a very important machine from a historical perspective and has been something of a Holy Grail for me for a few years now. They don't pop up very often, and the early model especially are as rare as hens teeth. So imagine my surprise a couple of weekends ago when a saved Ebay search turned up an original Deskpro 386 and it was still available when I clicked on the link. The machine was untested which is obviously a risk, and only had pictures of the outside case, however the price was very good and the shipping to Canada wasn't completely insane, so I closed my eyes and went for it. It also came with the operations guide which was a nice bonus.

It arrived far earlier than expected and was well packed in double boxes with lots of peanuts between them and foam and bubble packing surrounding the machine, so points for that. I quickly unpacked it to take a look and was happy with the initial impression.
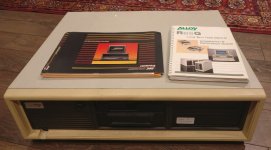
IMG_20201028_200547_resize.jpg

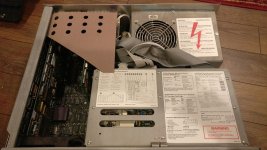
Opening the machine up also looked good.
IMG_20201028_201150.jpg

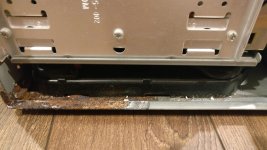
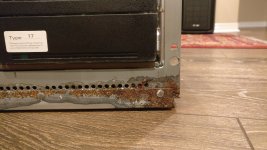
However closer inspection revealed some troubling signs with corrosion all along the bottom of the case in the front. Derp.....
IMG_20201028_201201.jpg
IMG_20201028_201230.jpg

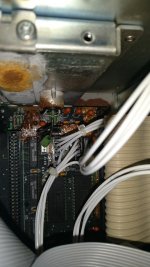
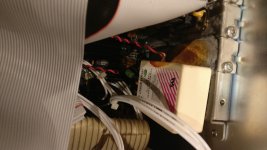
My fear of course was that the lithium battery had vomited its contents all over the inside of the PC and corroded the motherboard out of existence. I quickly grabbed a light and looked around the back of the case to see what I would find there. Needless to say my heart sank when I saw what had happened. Double derp.....
IMG_20201028_201504.jpg
IMG_20201028_201629.jpg

The immediate thoughts of course were that the computer is toast, but seeing as I've been looking for this machine for a long time I thought let's close the eyes again and plow ahead to see what we can make of this thing. So I removed the battery and got to work. I hope you'll enjoy taking this journey with me. :D

Next time.....disassembly.
 
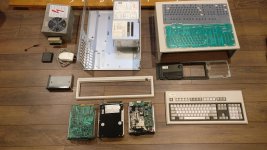
Having decided that even with the battery leak I might as well plow ahead and try my best to restore the machine, the next step was to take it all apart and assess what I had. The eBay listing didn't include any clue as to what the exact specifications were, so I was eager to see exactly what the machine came with. Obviously the first step was pulling the cards and taking an inventory.

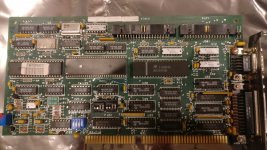
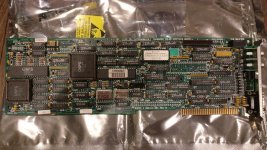
The first card out of the computer was the "Multipurpose Fixed Disk Drive Controller Board" (P/N 104174-001). This includes the floppy disk controller, the early IDE hist interface as well as the serial and parallel ports. It looks to be in good shape with no battery contents on it or the connector. Fingers crossed that everything is still in working order.
IMG_20201028_202314.jpg

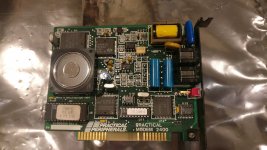
The next card was a Practical Peripherals 2400 BPS modem. This looks to have been added sometime after the machine was built. I have no real use for it, so it won't be going back into the machine most likely, but I'll hold onto it for historical purposes.
IMG_20201028_202404.jpg

The third board out of the machine was the graphics card. This machine appears to have been upgraded to the "Compaq Enhanced Colour Graphics Board" (P/N 106373-001). Based on the dates it's likely the V1 version of the board. Based on my research this is an EGA compatible board that was an upgrade over the standard Video Display Controller Board that offer Hercules Compatible monochrome. This board is interesting to me, however I don't have an RGBI compatible monitor to get the EGA signal out of it, so this will likely be replaced with a VGA board of some in order to make use of the CRTs that I already have, and to allow for a wider array of software to be used. I'll hold onto this in case I ever manage to snag a matching monitor.
IMG_20201028_202705_resize.jpg

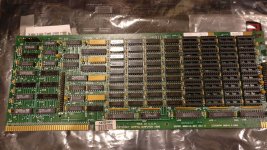
Next we have the 32-bit System Memory Board (P/N 108059-001) with 1 meg of static column RAM fitted. I had been hoping that the computer would have more than the 1 meg default, however that is obviously not the case. My eventual goal (assuming the computer works) is to get the machine up to 4 or 6 meg of RAM. According to the technical manual, the first step is to fully populate this board with an additional 1 meg of SCRAM. Looking at the already installed RAM chips I was able to find a couple of suppliers for the exact same chips, so I will be ordering those once I confirm the computer works. The next step will be to find either a 1-2 meg Memory Expansion Board (P/N 108082-001) or more ideally the 4-8 meg model (P/N 108083-001). So far these appear to be even more rare than the computer itself, so I will have to continue to keep my eyes open.
IMG_20201028_203711_resize.jpg

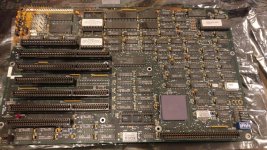
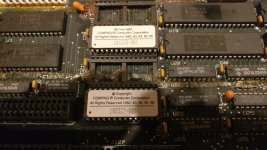
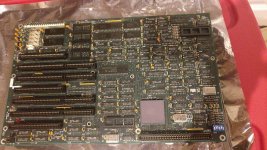
Here is the motherboard. It's a Ver. 1 board (P/N 108060-001) with a Rev. F ROM fitted. This is the second revision of the ROM, coming out in October of 1986, one month after the machine launched. This pegs this Deskpro 386 as one of the earliest machines out in the wild, which makes it very exiting and definitely worth saving. You can see the contents of the battery spilled out all over the top left of the motherboard near the power connectors and running down the length in two thin streams. It's hardened in place, so I'm going to get to work on this contamination next to see if it can be removed, and determine what the board looks like underneath. Apart from that residue the board looks to be in perfect shape, almost like new.
IMG_20201028_211408.jpg
IMG_20201028_211418.jpg

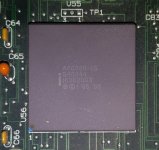
Also of particular note is the CPU. Based on the S40344 code on the second line, it's a B1 stepping. However it lacks any marking that says either 16-bit S/W Only or the Double Sigma. It appears that this machine was sold before the Intel recall for the 32-bit multiply bug where the CPUs were tested and marked with the aforementioned notes based on whether they passed the multiply tests or not. I have never seen one of these before and would make it quite early in the 386 release, and a rare bird indeed. Hopefully, it won't be affected by the bug. ;)
IMG_20201029_105945.jpg

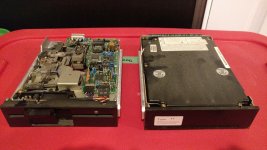
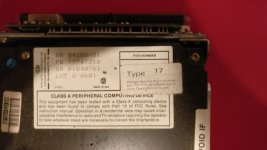
Finally we have the floppy and hard disk drives. The floppy drive is the standard 1.2 meg 5.25" model (P/N 102775-001). Because of the early ROM in the machine 3.5" drives are not supported, which will make moving files to the computer a little trickier. My 286 will be pressed into duty for this task. The hard drive is a 40 meg model (Compaq P/N 108058-001) made by CDC (Control Data Company). As far as I know this was the first IDE hard drive released in a commercial computer and was specifically developed for the Deskpro 386 in collaboration with Compaq and Western Digital. Very cool. I'll be very curious what treasures could be on it if it works. I may try to find another one to expand the internal storage while keeping it historically appropriate to the machine.
IMG_20201101_092122.jpg
IMG_20201101_092132.jpg

Next let's try to tackle the motherboard. :|
 
Definitely following your progress. A rare machine and really hoping for a successful outcome. Thanks for documentation the process.
 
Very nice find! Note that the Tantalum caps might be suspect - Compaq boxen from that general period tend to have issues with 'em...though maybe that's just my luck.
 
You should be able to install a 3.5" 1.44M drive and call it a 1.2M one--and still get read access to 3.5 HD floppies. The data rate is the same. Formatting may be a different matter without a BIOS upgrade of some sort, unless you use a third-party package that drives the floppy I/O directly.
 
Any way for me to test those beforehand, or do I just apply power and hope for the best?
Not really. They may not even be fully shorted until full power is applied. All you can really do is power it up, and if you are lucky any bad ones will blow up. Lucky, because if not then you are left guessing which ones are shorting.

Just be sure to duck and cover before flipping the power switch for the first time.
 
I’m so jealous. I recently grabbed a 386/25 at computer reset because I didn’t realize there was a 386/16 that was older. Just after my time was up one of the volunteers mentioned there was on original one, so in a rush I grabbed it. I didn’t take the time to open it, and it turns out that it was a 286 12mhz with a 386 cover. :(

I’m not too upset, I’m happy to have the later 386/25 too, but it would have been cool to get the first one. I was also able to grab copies of the technical manual and the service manual.

I’ve got a couple of EGA cards too.
 
Any way for me to test those beforehand, or do I just apply power and hope for the best?

I wouldn't apply power to anything before cleaning up the MoBo. Any of that corrosion could be (and likely is) somewhat conductive---potentially taking out something that otherwise would be fine.
 
I wouldn't apply power to anything before cleaning up the MoBo. Any of that corrosion could be (and likely is) somewhat conductive---potentially taking out something that otherwise would be fine.

Absolutely. I'm going to make sure it's clean and confirm to the best of my ability that there are no shorts before even trying to apply power.

The cleaning is actually in process and even at this stage I think there is hope for this board. Fingers are crossed!!!
 
I’m so jealous. I recently grabbed a 386/25 at computer reset because I didn’t realize there was a 386/16 that was older. Just after my time was up one of the volunteers mentioned there was on original one, so in a rush I grabbed it. I didn’t take the time to open it, and it turns out that it was a 286 12mhz with a 386 cover. :(

I’m not too upset, I’m happy to have the later 386/25 too, but it would have been cool to get the first one. I was also able to grab copies of the technical manual and the service manual.

I’ve got a couple of EGA cards too.

I'm jealous that you get to go to Computer Reset. Living up here in Canada my chances of every making it in there are slim. :-(
 
So after a few nights of effort I think I've got this motherboard as clean as I'm going to get it. It cleaned up far better than I had any hopes for when i first saw it, and I think that there is a good possibility that I'll have a working system at the end of all of this. :)

I used a variety of different techniques to try and remove the contamination ranging from scrubbing with different soaps to soaking in water and other liquids to try and loosen the material. In the end, this is the sequence that I ended up following get around 95% of the gunk removed.

I removed the ROM chips so that they would be out of the way as I cleaned the sockets, however there was no traces of the material on the legs when I pulled them out, so I don't think the sockets are too badly contaminated.

1.) Scrub of the affected areas using warm water and dish soap with a toothbrush. This actually worked better than I thought it would and is where the majority of the time was spent. After about 4 hours of scrubbing it got me around 70% of the way there. The really stuck on stuff remained however.
2.) Rinse with water to remove the soap.
3.) Alcohol soak of the affected areas to try and loosen the gunk that way. Worked the gunk with a toothbrush while in the alcohol, but it didn't seem to do much.
4.) Scraping of the remaining gunk with a plastic, flat edged scraper while still in the alcohol. This also worked quite well and removed much of the remaining large areas of material.
5.) Scrub all of the affected areas again with the soap and water mix using a toothbrush. Particular attention was paid to the legs of any ICs to remove anything stuck to them. I worked at this for a couple of more hours, and made a bit of progress.
6.) Another rinse with water to remove the soap.
7.) I made a gentle abrasive paste using water and baking soda. I worked my way around the affected areas and IC legs first using a toothbrush and then by gently scraping with the plastic scraper with the baking soda still on there. This worked very well and removed much of what remained.
8.) Vinegar rinse to neutralize the baking soda, and I hoped that the foaming action would perhaps remove some additional material.
9.) Water rinse with lots of water to remove any remaining vinegar and baking soda.
10.) Rinse with lots and lots of 99% IPA to displace the water and reduce chance of further corrosion. Air dry.

In all this took several nights to accomplish, but I'm happy with the results. It appears that through sheer luck the material from the battery basically sat on the surface of the board and dried. It hasn't appeared to eat away at any of the solder and all of the traces on the board look good. I've tested them with my multimeter where I can and have good contact everywhere. The remaining contamination doesn't appear to be conductive and when I test between adjacent legs of the ICs in the area there is no continuity between them. All the resistors that were covered come back with sensible readings and even the fuse which was fully coated has continuity.

In all it's still not perfect looking and likely never will be, but I feel confident that I have the basis of a working computer and with a bit of luck on the tantalums I hope that it will power up.

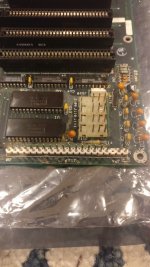
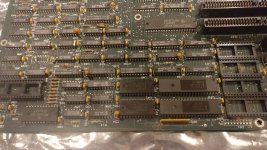
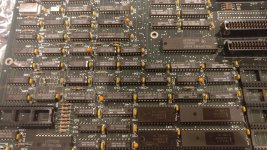
Here are some images of the handywork.

IMG_20201103_052322.jpg

IMG_20201103_052417.jpg

IMG_20201103_052429.jpg

IMG_20201103_052444.jpg
 
You may want to remove the sockets from the board and clean under them. I've found through cleaning many boards that no matter how much you scrub and rinse, corrosion and junk likes to hide under sockets and under large chips.

You may consider replacing the sockets with better machined versions as well, the sockets on that board look really cheap and may have perpetual connection issues.

So I don't have the de-soldering equipment that would give me confidence that I could remove those sockets without causing more problems for the board than I was trying to solve. I did take your advice to heart however and scrubbed at the pins under the sockets with a toothbrush and soapy water for over an hour. The sockets stand a little bit proud of the board so I was able to get under there quite effectively.

Looking under there now with a bright light source it looks quite clean. Working to my advantage is the fact that the sockets that were the most contaminated actually stay empty and the ROM chips fit in the clean sockets.

I feel reasonably confident that the condition of this area is good now.
 
Now that I'm reasonably sure that the motherboard is in decent shape I wanted to take a look at the power supply.

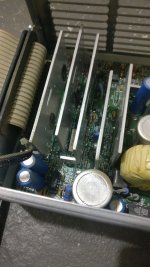
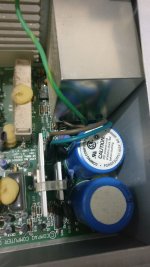
There was a bit of corrosion on the bottom plate, but it is surface only and doesn't appear to have gotten in the the main body. In addition there is a gap between the bottom plate of the power supply and the circuit board inside so there is no way that the board could have come in contact with any of the leakage from the battery.

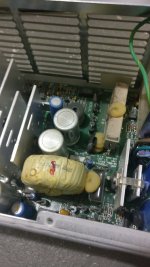
I opened up the top and took a look inside.

IMG_20201031_073552.jpg

IMG_20201031_073558.jpg

IMG_20201031_073603.jpg

Looking around inside, apart from some dust, things seem pretty good. There are no bulging caps or leaked out electrolyte that I can see. All the traces look good. The solder joints appear to be intact. I've cleaned up the dust and sealed it back up.

I wanted to try and power up the supply on it's own just to make sure it doesn't blow up, however looking at the Service Manual for the Deskpro it appear that the power supply is expecting signals back from the motherboard and if it doesn't get them it shuts itself down as a safety precaution. This makes testing the power supply on it's own tricky.

Ultimately it will have to be hooked up to the motherboard and powered up to make sure the whole combo works, however if anyone has any ideas on how to test it by itself I'm open to suggestions. Or perhaps I'm being over cautious?
 
Looking under there now with a bright light source it looks quite clean. Working to my advantage is the fact that the sockets that were the most contaminated actually stay empty and the ROM chips fit in the clean sockets.

I feel reasonably confident that the condition of this area is good now.

Not being a naysayer, but I tend to disagree. If your last run of photos is accurate, I'd be quite concerned with what appears to be under the sockets still (especially the third one from the bottom). Even though they may stay empty, it doesn't mean that there couldn't be current running through them to other parts of the motherboard. As GiGaBiTe mentions, you really need to remove anything suspect to thoroughly inspect. If you don't have desoldering equipment, find someone who does. I see stuff like this daily in my job and strongly caution you to inspect more closely.
 
Desoldering guns aren't terribly expensive. But good old solder wick, flux and a sufficiently powerful iron can get sockets off the motherboard, it's just a bear sometimes if there are a lot of power planes nearby.
 
I managed to pull in a couple of favours at work and am getting one of the techs to desolder the sockets for me today. I'll give it clean once he's got them off. Fingers crossed! :)
 
While I continue to work on getting the motherboard as clean as I am able to, I thought with the warm weather we've been having around here it would be a good time to work on the case and all of the related bits in order to get them restored to as new a condition as possible.

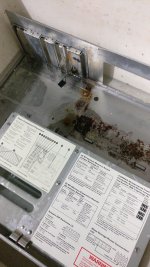
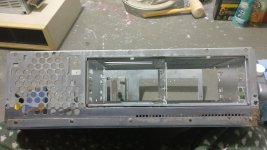
As you can imagine, with a battery spill as bad as the one this computer had, the damage to the case was pretty severe. When I lifted the motherboard away I was greeted with what I could only described as a pile of corrosion. I immediately got to work on removing as much as I could. The first step was physically lifting away as much as possible. The largest chunks came off fairly easily, until I was left with this as a starting point.

IMG_20201030_185827.jpg

As you can see the corrosion did quite a bit of damage to the metal at the base of the machine. My next step was to go at it with an abrasive pad to try to mechanically sand away as much as possible while trying to avoid damaging the the still good metal around it. I tried both dry and wet sanding the affected areas. I made some decent progress, however the most damaged areas still retained a lot of corrosion. I next tried a metal brush to see if something even more coarse could pull some of it off. Once more, this removed a little bit of it, but the majority remained stuck in place.

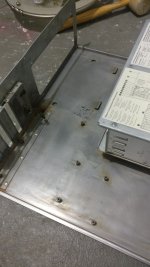
The next step was one that I didn't want to take; but there appeared to be no alternative. I soaked the bottom of the case in a weak vinegar solution to try to chemically loosen the material. I was loath to do this since it could also damage the galvanization on the metal, but I wasn't getting anywhere otherwise. The results actually came out quite well as can be seen.

IMG_20201031_075706.jpg
IMG_20201031_075725.jpg

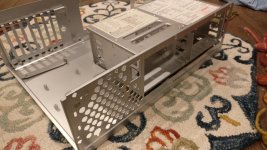
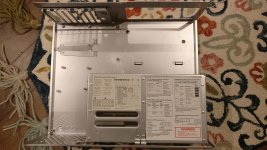
It of course damaged the galvanization as I had feared which left the metal prone to oxidation. Luckily I had kept the slot covers separate so I had a reference to the colour of the original case material. I purchased some Tremclad rust paint in order to protect the metal from further damage and after masking off all the labels and any other areas I didn't want painted I gave it a good coat. The colour I found (gloss aluminum) actually turned out to be an almost perfect match to the original metal, so I was actually very happy with the results. Not only does it look good (in my opinion), but the metal is now protected again.

IMG_20201102_194840.jpg
IMG_20201102_194931.jpg

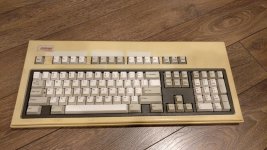
I had also been holding on to the matching Compaq Enhanced Keyboard for a while now in anticipation of finding a working Deskpro 386 someday. I managed to snag one off eBay for a good price in fairly dirty and untested condition. I had tested when it arrived and confirmed that it was working, but the case and keys definitely needed some good cosmetic work.

IMG_20201101_182609.jpg

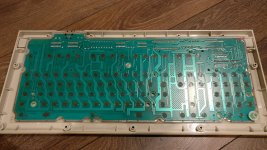
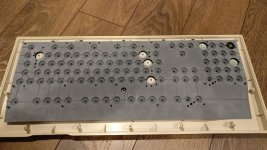
I took the keyboard apart for a good cleaning and was pleasantly surprised to find a rubber dome construction which saves me the trouble of replacing all the foam and foil bits! :)

IMG_20201101_182910.jpg
IMG_20201101_182915.jpg

After a good scrub to clean off all the dirt I Retrobrited the case and keys back to their original colour.

I also took the time to take apart the outer computer case and gave it a good cleaning as well. Some mild soap and water followed by a baking soda scrub returned the outer case paint to it's original colour and all of the plastic bits from the out case were cleaned in mild soap and water and Retrobrited as well.

It all cleaned up perfectly, so I now have a fully restored case waiting for reassembly once the motherboard is taken care of. I'm very happy with how all these look and can't wait to see it all back together again!

IMG_20201105_144151.jpg
 
Back
Top