WaveyDipole
Experienced Member
Thanks. I didn't have that one. I had assumed that might be the case but its good to have the confirmation.
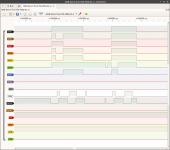
I hooked up an LA and what I am seeing is a bit strange. The trace shows what I get in response to a FIND@5:1 command. The ATN gets asserted by the controller (Tek) as expected but no commands are being sent. About halfway through the trace both NRFD and NDAC end up being un-asserted, probably due to timeout.
When ATN is first asserted by the Tek, both NDAC and NRFD are asserted as expected. NRFD is then un-asserted by the 4924 emulator to indicate that it is ready to receive data, but no data gets placed on the bus and the Tek does not assert DAV to indicate data is available. In other words no command bytes are being sent. After a period, the ATN signal gets un-asserted. During this time, the Tek should have sent an MLA, an address and an MSA 0x73. Once the commands are sent, ATN should get un-asserted and we should see a couple of data bytes placed on the bus (the file number '1' + CR) and then finally ATN should get asserted again and an UNL command sent.
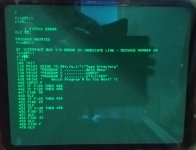
I ran another trace with only the Tek connected to the LA. The emulator was disconnected. It shows a similar pattern and gives the same MESSAGE 69 error on the screen except that NDAC and NRFD never get asserted because there is no device on the bus. I also tried a further with a WRITE command (emulator connected) to see how the Tek would behave in the sender role. The results were similar and the same error message appeared on screen.
I am trying to understand what all this means. The Tek is clearly capable of manipulating the data bus as we can see all lines switching between high and low. The REN and ATN signals also get asserted so both of these lines work. From the circuit diagram I see that DAV, NDAC, NRFD and SRQ are handled by one MC3441 chip (U91) whereas ATN, REN, IFC and EOI are handled by a second MC3441 IC. Data buffered by a further two MC3441 chips. U183B and U193C also come into play, but I am wondering whether U91 is faulty. Judging from the flux present on the underside of the board, it appears that U91 had been replaced at sometime in the past.
The other aspect of this is that no data is getting placed on the data bus ( DIO-1 thru DIO-8 ) and the link between the three ICs involved is the TALK signal which is passed through gates on U193 (74LS02), but then both gates B and D would have to be affected. It is also possible that the PIA is not seeing the state of NDAC and NRFD in which case either U91 or U183B could be responsible.
I guess the next step is going to be to attach the LA directly to the PIA (U265) to see what it is doing and have a look at the gates U193B and U193D.
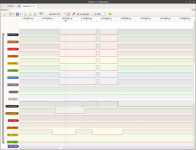
I hooked up an LA and what I am seeing is a bit strange. The trace shows what I get in response to a FIND@5:1 command. The ATN gets asserted by the controller (Tek) as expected but no commands are being sent. About halfway through the trace both NRFD and NDAC end up being un-asserted, probably due to timeout.
When ATN is first asserted by the Tek, both NDAC and NRFD are asserted as expected. NRFD is then un-asserted by the 4924 emulator to indicate that it is ready to receive data, but no data gets placed on the bus and the Tek does not assert DAV to indicate data is available. In other words no command bytes are being sent. After a period, the ATN signal gets un-asserted. During this time, the Tek should have sent an MLA, an address and an MSA 0x73. Once the commands are sent, ATN should get un-asserted and we should see a couple of data bytes placed on the bus (the file number '1' + CR) and then finally ATN should get asserted again and an UNL command sent.
I ran another trace with only the Tek connected to the LA. The emulator was disconnected. It shows a similar pattern and gives the same MESSAGE 69 error on the screen except that NDAC and NRFD never get asserted because there is no device on the bus. I also tried a further with a WRITE command (emulator connected) to see how the Tek would behave in the sender role. The results were similar and the same error message appeared on screen.
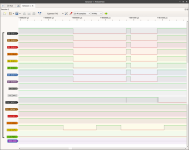
I am trying to understand what all this means. The Tek is clearly capable of manipulating the data bus as we can see all lines switching between high and low. The REN and ATN signals also get asserted so both of these lines work. From the circuit diagram I see that DAV, NDAC, NRFD and SRQ are handled by one MC3441 chip (U91) whereas ATN, REN, IFC and EOI are handled by a second MC3441 IC. Data buffered by a further two MC3441 chips. U183B and U193C also come into play, but I am wondering whether U91 is faulty. Judging from the flux present on the underside of the board, it appears that U91 had been replaced at sometime in the past.
The other aspect of this is that no data is getting placed on the data bus ( DIO-1 thru DIO-8 ) and the link between the three ICs involved is the TALK signal which is passed through gates on U193 (74LS02), but then both gates B and D would have to be affected. It is also possible that the PIA is not seeing the state of NDAC and NRFD in which case either U91 or U183B could be responsible.
I guess the next step is going to be to attach the LA directly to the PIA (U265) to see what it is doing and have a look at the gates U193B and U193D.
Attachments
Last edited: