• Please review our updated Terms and Rules here

Power Supply dead

Funny thing, I found a date on the bottom of it - it reads "MAR 9 1979". That means it will soon turn 30, that just settle a deadline for my project; my Apple has to be up running again before so I can celebrate the birthday in a proper way...:)

That's about the same vintage as my Apple II Europlus.

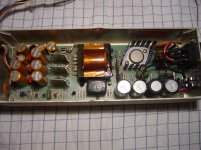
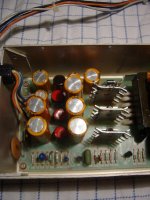
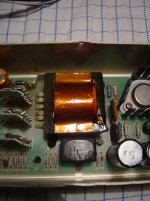
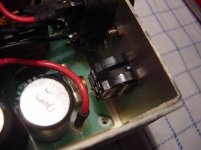
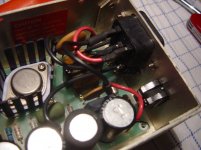
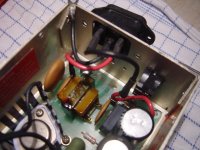
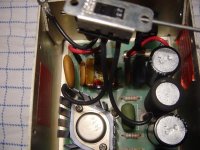
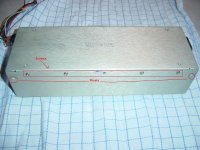
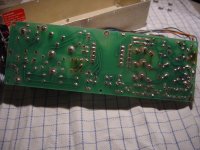
Those power supplies can be difficult to get into. I recently got hold of a lot of old apples and apple clones. Thankfully all the geniune Apple power supplies were working. Some of the clone PSUs were not however. I tried to disassemble them, but it proved no easy task. I had to destroy the rivets.

IIn the end I decided I had enough working PSUs so I didn't need to fix the broken ones. Besides that they were very rusty and corroded.

Good luck with the repair.

Tez
 
Tez,

Generally they are easy repairs...

Astec unit: Replace 1 cap in the feedback section
Non-Astec unit: Replace 1 cap and 1 resistor in the feedback section

Beyond that, it's a matter of simply looking for shorted diodes - both the bridge rectifier or the low voltage side diodes. If the fuse is blown, it's the bridge rectifier.

Those tidbits will fix 95+% of the Apple II+/IIe power supplies.

RJ

Thanks. Good to know if I ever come across any more, or if my existing ones start to give me trouble.

Tez
 
channelmaniac: Generally they are easy repairs...
Astec unit: Replace 1 cap in the feedback section
Non-Astec unit: Replace 1 cap and 1 resistor in the feedback section ... RJ
Now those are indeed interesting tidbits. I haven't really groked switching supplies. Do you have a link or general diagram to help in finding or identifying the feedback section and those specific parts if they aren't obvious? There's probably others here that would be interested too. :)
 
I tried to disassemble them, but it proved no easy task. I had to destroy the rivets.


Good luck with the repair.

Tez

Thank you. I will continue on my work tonight. Yes, I am affraid I also have to drill out the rivets too - does anyone know if I can destory anything inside the box when I drill those out?
 
There are components inside that could be damaged if you drill too far in. I like to use a small set of electronics type diagonal cutters to slide under the rivet head and cut it. It'll leave some scarring around where the rivets were but is much safer on the components.

RJ
 
Hey there again.

I just drilled out the rivets, turned out it was not even nessasary to remove the rivets at all. Nevertheless, the box is open now!..:)

I have just taken som pictures of the inside:
 

Attachments

  • DSC01419.jpg
    DSC01419.jpg
    104.4 KB · Views: 1
  • DSC01421.jpg
    DSC01421.jpg
    101.5 KB · Views: 1
  • DSC01422.jpg
    DSC01422.jpg
    103.5 KB · Views: 1
  • DSC01423.jpg
    DSC01423.jpg
    102.9 KB · Views: 1
Wow... I've worked on > 100 of those supplies and I've never seen that layout before.

Can you take the board out and take pictures of the bottom so I can see where the traces go?
 
Yes, I will do that.

Remember, this Apple was bought in Europe, there might be some differences beetween layout Europe and US between.
 
Wtf, it seems like the box has been opened before.

Try to take a look at the pictures I just have taken. The on/off switch on the back, is not connected to anything at all inside the box. We have had this computer since new, except for 5-10 years where a family member used it; or actually, I think she used it very little. Anyway, since we got it back again it has not been working.

I maybe think the switch may has been bad, and someone has tried to fix this so the power was always on. Anyway, try to look at pictures.
 

Attachments

  • DSC01424.jpg
    DSC01424.jpg
    101.3 KB · Views: 1
  • DSC01426.jpg
    DSC01426.jpg
    101.6 KB · Views: 1
  • DSC01427.jpg
    DSC01427.jpg
    98.7 KB · Views: 1
Wow... I've worked on > 100 of those supplies and I've never seen that layout before.

Can you take the board out and take pictures of the bottom so I can see where the traces go?

I tried to remove the board, but it is impossible, or at least it is without cutting anything at first. But I tried to disassemble it as much as I could. Here are some final pictures of it. I tried to take pictures of how the power was running from the power input.

I don't know what to do now?
 

Attachments

  • DSC01428.jpg
    DSC01428.jpg
    100 KB · Views: 1
  • DSC01429.jpg
    DSC01429.jpg
    104 KB · Views: 1
Should be simple to remove. Unplug the power cables from the board, crimp the big black plastic insert holding the wires with a pair of pliers, and pull it out from the hole. Once it's out of the hole you should be able to remove 6 screws holding the board in place and lift it right out.

Raymond
 
The usually way to remove rivets, is to estimate size of the hole that the rivet passes through. Drill straight through center of the head of the rivet until the head is separated from the shaft. You will end up with the flange of the rivet head on the drill bit shaft and the shaft of the rivet can then be pushed or will fall through the hole. There should be no damage to the hole itself or surrounding surface and it can be easily restored with a new rivet to like new status. If I remember right, the one Apple power supply I drilled the rivets out of, had a 1/8 inch hole.

Regards,
Mike Willegal

Hey, thanks. I drilled the rivets out yesterday. As mentioned in one of my earlier post, somebody has repaired the power supply before me. But I assume there have been 5 rivets on each side of the box to hold the bottom; in my case there was no rivets, but screws instead. Nevertheless, there was still 4 rivets, 2 placed on each side. Unfortunately it was not necessary to remove these 4 rivets, but I first figured that out when I had done it.You can see at the picture where the screws and rivets was.
 

Attachments

  • DSC01415.jpg
    DSC01415.jpg
    109.8 KB · Views: 1
Yes, rivets are a pain in the ****. I don't know why Apple (or whoever built the power supplies) didn't use screws. Obviously they didn't expect people to attempt a repair even though, as has been mentioned, it's generally quite straightforward.

Getting into the box is often the hardest part!

Tez
 
Wow... I've worked on > 100 of those supplies and I've never seen that layout before.

I have - probably a European variation -

will read further but do the inlet fuse, the bridge rectifire (;)) and the cap next to it look a bit crispy. EDIT - no sorry, must have been shadows on the photo.
 
Well,

If you took that pic before you opened it then someone else has already been in it.

There are 4 screws along each side of the bottom to remove the cover. In the middle there are empty holes. That is where the rivets were that you were to remove.

RJ
 
Back
Top