• Please review our updated Terms and Rules here
  • From now on we will require that a prefix is set for any items in the sales area. We have created regions and locations for this. We also require that you select a delivery option before posting your listing. This will hopefully help us streamline the things that get listed for sales here and help local people better advertise their items, especially for local only sales. New sales rules are also coming, so stay tuned.

The South Soldering skills for soldering chip to motherboard

Covers: Oklahoma, Arkansas, Louisiana, Mississippi, Kentucky, Tennessee, Alabama, Georgia, North Carolina, South Carolina and West Viriginia.

Rubix

Experienced Member
Joined
May 20, 2007
Messages
163
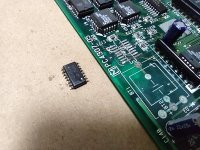
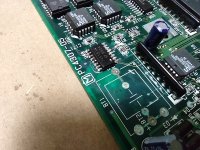
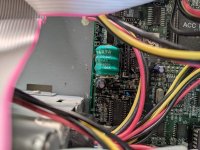
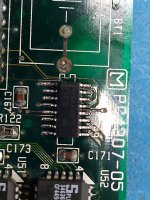
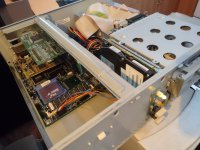
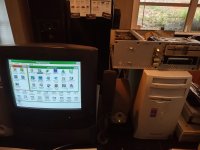
Hi all, I have a 486 board in a nice Packard Bell that I am trying to save. Due to a leaking battery, a chip came loose from the board. I have tried re-soldering it with solder paste, but the paste doesn't stick to the metal, possibly because of the corroded surface. I have tried some other methods, but I don't have the skill do repair it. I am hoping that someone here has the steady hand and soldering skill to repair this for me. Just let me know what you think is a fair deal in return. I can ship the board.

Thank you!
 

Attachments

  • 2022-05-31 11.44.41.jpg
    2022-05-31 11.44.41.jpg
    1 MB · Views: 70
  • 2022-05-31 11.44.52.jpg
    2022-05-31 11.44.52.jpg
    1 MB · Views: 68
You need to clean the contacts and use alot of flux to make the solder stick. Your mostly there just buy some flux. Make sure when you are done to thoroughly clean with isopropyl alcohol to remove the flux residue and test each pin with a multimeter for continuity. You can do it, you just need a soldering iron.
 
There are techniques for soldering SMDs that appear to be contrary to common sense. For example, use a broad wedge-shaped soldering tip and flow solder over the chip leads. Then clean up with soldering braid. See Dave's tutorial.
 
Initially, clean the pads with Isopropyl Alcohol (90% or better). If there's no pad damage (and pads are still attached solidly to the fiberglass on the board), moderately attack the pads with a scratch/fiberglass pen. Use tacky-flux and solder wick to remove any remaining solder on the pads (you want a nice, flat and conductive surface on both the pads and the bottom of the legs on the chip before resoldering to the board). Again clean with Isopropyl and make sure to dry. Apply a liberal amount of tacky-flux to the pads on the board and center the chip on the pads. Tack down the corner pins with a small amount of solder (to prevent movement while soldering other pins). Solder each pin carefully (SMT equipment really helps with small components). Inspect for bridges between pins (remove any with solder wick and touch-up). Clean again with Isopropyl and let dry. If this appears to be too much, just PM me and we'll try and work something out. I deal with such on a daily basis at work. Just realize that with a corroded battery, even replacing the chip may not fix the board. I'm located in Western NC.
 
Last edited:
They already covered what I would do, besides clean up the area with vinegar first, then alcohol, just to remove anything else that might be remaining from the leaky battery.

Lots of flux is your friend in this situation. Make sure its no-clean flux, not paste for soldering pipes.

Edit: You got this! 👍
 
Last edited:
Oh wow I didnt even look up close before. Half those traces are eaten. That is going to need someone most likely if you aren't very good at soldering. The via's on top that chip look horrid.
 
Ya, I wouldnt touch it. I'm ok at fixing stuff dual layer but after that ugh. I just tried other day to fix a Compaq 486, bios chip socket was broken. So pulled it off with the hot air iron no biggie. Figured I just solder the bios chip to the board, and did my normal heating up the board yadda yadda. Heated it up till the solder dragged the chip in. Pulled air off and damn board got a blister like a pizza. Just puffed right up. Stupid ground plane I guess cooled faster. :(
 
Don't get me wrong I love a challenge. But I love a challenge when its my OWN hardware. I couldn't guarantee I can fix this. I wish you luck kind sir. This is quite the challenge, might be easier to find a working board. This era really sucks to work on.
 
Wowzers---after previous comments, I zoomed in on the first photo. Are those the pads from the motherboard still attached to the IC?!!! If so, then the MoBo is likely a goner.
 
Fiberglass pen, and vinegar, then clean with isopropyl alcohol then solder wick. and then keep doing the until everything looks nice and shiny.
I would also clean out the battery holes also. They still have junk in them that can still spread.
 
There are techniques for soldering SMDs that appear to be contrary to common sense. For example, use a broad wedge-shaped soldering tip and flow solder over the chip leads. Then clean up with soldering braid. See Dave's tutorial.
Thank you so much! That video explains a lot. I'm afraid I don't have the steady hand for this small chip but it's certainly been very helpful to learn more about soldering in general.

Initially, clean the pads with Isopropyl Alcohol (90% or better). If there's no pad damage (and pads are still attached solidly to the fiberglass on the board), moderately attack the pads with a scratch/fiberglass pen. Use tacky-flux and solder wick to remove any remaining solder on the pads (you want a nice, flat and conductive surface on both the pads and the bottom of the legs on the chip before resoldering to the board). Again clean with Isopropyl and make sure to dry. Apply a liberal amount of tacky-flux to the pads on the board and center the chip on the pads. Tack down the corner pins with a small amount of solder (to prevent movement while soldering other pins). Solder each pin carefully (SMT equipment really helps with small components). Inspect for bridges between pins (remove any with solder wick and touch-up). Clean again with Isopropyl and let dry. If this appears to be too much, just PM me and we'll try and work something out. I deal with such on a daily basis at work. Just realize that with a corroded battery, even replacing the chip may not fix the board. I'm located in Western NC.
Wowzers---after previous comments, I zoomed in on the first photo. Are those the pads from the motherboard still attached to the IC?!!! If so, then the MoBo is likely a goner.
Thanks a bunch for the helpful tips and the offer. I'll send you a PM. In terms of the pads; those are part of the chip. Gladly nothing was torn off from the motherboard. The ends of the legs of the chip have been bent flat to be able to surface-mount it.
Oh wow I didnt even look up close before. Half those traces are eaten. That is going to need someone most likely if you aren't very good at soldering. The via's on top that chip look horrid.
I agree that the situation looks pretty bad. The traces still connect though. To be honest, I'm surprised how relatively well the board held up considering the damage to the bare metal parts.

considering the postsr hasnt been back to this thread since starting it, I wouldnt worry about it.
I'm sorry about that. I didn't get a notification, so I assumed there had been no replies while in fact, people had been posting super helpful replies!
 
Was it an alkaline type battery? ( NoCads are alkaline) If so, first remove any flux with the alcohol. Then use white vinegar to get things clean. It might take several hours. Then rinse with water.
When clean follow others soldering instructions.
Dwight
 
That board looks like a basket case. If you look at the color of the PCB, it looks like the electrolyte may have wicked inside the board, in addition to all of the trace damage on the surface.

It's going to be a very involved, time consuming repair to even attempt to get that board working again. Just putting that IC back on the board isn't going to do anything most likely.

If I weren't so busy right now, I'd offer to take a look at it. As it is, it'd probably be weeks before I could get to it.
I really appreciate your help. T-R-A is taking a look at it right now. Hopefully he can get the board back to life. It would be great to save this machine.
 
T-R-A (Dale) did an amazing job on resoldering the chip! Look at the mess it was, and what he managed to make of it in the end. He let me know that if anyone else needs work like this done, he's more than willing to take on other soldering jobs. He charged a fair price and most importantly, it saved this cool Packard Bell 486 which are becoming increasingly rare to find.
 

Attachments

  • packard bell corrosion.jpg
    packard bell corrosion.jpg
    871.1 KB · Views: 27
  • IMG_20220628_161216796.jpg
    IMG_20220628_161216796.jpg
    1.4 MB · Views: 27
  • 2022-07-08 19.31.19_small.jpg
    2022-07-08 19.31.19_small.jpg
    693.4 KB · Views: 27
  • 2022-07-08 19.42.28_small.jpg
    2022-07-08 19.42.28_small.jpg
    590.8 KB · Views: 20
Back
Top