• Please review our updated Terms and Rules here

Ampere WS-1: Fixing Plastic Crack?

I use steel wool and jb weld in these kind of repairs. Sometimes you can get lucky and a soldering iron works, but in this case don't believe this will work.
 
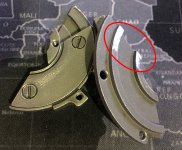
It's quite apparent from the photos that the plastic failed from lateral forces. Therefore, the strength of the repair will be a direct result of the strength of the bond between the resin and the remianing plastic.
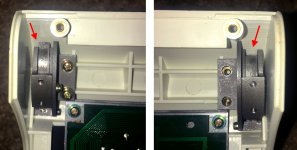
Yup! The cause of the problem was a failure in the right hinge. For some unknown reason, it stopped retracting fully! So when the lid is closed, the plastic experience twisted tension due to the difference in traveling distance between the two hinges.
IMG_5021.JPG

I disassembled the right hinge and filed a bit of the metal as in the photo below. It works flawlessly now.
IMG_5036.JPG
 
I wonder if the failure is symptomatic of the plastic generally degrading. If that's the case (think old 90s Apple gear), any fix will just be a stopgap until something else fails.

Plastic is forever only if it's discarded roadside trash, it seems.
Yes it is.
You can see by the type of insets used, they put outward pressure on the inside of the hole. There is a constant force trying to expand the plastic after they are pressed in. I think that is how they were fitted rather than molded in. The reason is I have seen these specific inserts for sale to be pressed into plastic.

I think that as the plastic ages it hardens and cracks under pressure.

It is important fitting any new inserts to aged plastic, never use a press in or interference fit, or it will crack. It is better to have a small clearance and glue the insert in with 24 hr epoxy resin to avoid these forces. Or the plastic will crack at the time, or later.
(ps: avoid 5 minute epoxy resin glue, it does not set hard enough)
 
Metal inserts in plastic do often cause problems. One of the biggest problems I see is when they mold a nylon gear around a metal core. The nylon shrinks as it cools, and is under constant tension. Eventually, the plastic cracks, but it usually takes 10+ years. The repair tick I usually use there is to repair the gear first, then heat the metal part so that it melts a layer of plastic around it to reduce the stress on the gear. If it's a small gear pressed onto a motor shaft, I heat the shaft, and also use some adhesive. Another option is to drill out the hole so it's snug, but not too tight.

This assumes the plastic isn't from a bad batch that became extremely brittle. If it is, then nothing will fix it for long. I ran into this recently with an Amiga 500 where the top cover is so brittle it can hardly be handled, but the bottom cover is still perfectly strong. They're both the same kind of plastic, and were exposed to the same kind of conditions, yet one has gone brittle.
 
I thought there's no point promoting a repair method without backing up it up with some examples of high-stress situations. Here's some of the things I've fixed using Kevlar binding.
Note the compactness of the results, which are IMO stronger than the original items.

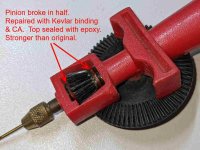
#1 Hand drill plastic bevel gear had split in two pieces from excessive force. There was enough area each end for the fix:
Binding_repair_1.jpg


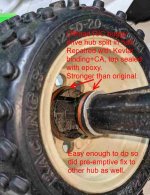
#2 Offroad R/C buggy rear wheel drive hub broke in half when driving. Repair is small, light, waterproof:
Binding_repair_2.jpg


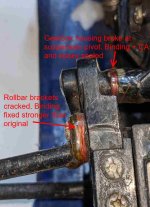
#3 Offroad R/C buggy gearbox housing around steel pivot shaft cracked from excessive impacts. Easy repair:
Binding_repair_3.jpg

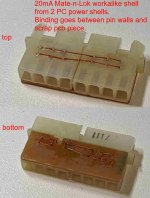
#4 Workalike 20mA teletype Mate-n-lok nylon shell from two PC power connectors and a scrap of pc board:
Binding_repair_4.jpg

A cotton-reel-sized spool of Kevlar thread is cheap on eBay, in different colours, get the unwaxed variety. Never try and snap it with your hands or you'll injure yourself badly.
It is sold for use by custom fishing rod builders to put the line guides on the rod.
A single spool will last you a lifetime of repairs.
 
Nice. My question is how do you know it's stronger than the original? How would you measure that. Not being coy. Really curious.
 
Engineering experiance and common sense I would imagine....

I've done similar repairs and know a few old skool engineers that repair old kit of all sorts as a hobby just to keep there brains active.

One who I use to go for m/c rides because all has mates had passed unfortunately has been given 3-12 to live because of cancer of the liver. I'll miss him when he passes. He was a diesel engineer in his younger days. Is very talented at making/building steam driven gadgets. such as stationary engine to quite large model locomotives.

I'm current repairing the plastic of my Compaq P1 clase all-in-one system and large whole ib plastics are a peice of piss using a pyography iron, a suitable piece of suitable plastic to fill the gap,well in, sand back the join and finish off with a suitable custom color matched paint bomb from the local Automotive paint outlet.
 
Last edited:
Nice. My question is how do you know it's stronger than the original? How would you measure that. Not being coy. Really curious.
That's a good question, and one I considered when making that claim, which I would like to justify as follows. In the case of the drill pinion, cracking axially was the initial failure threshold. Once bound, it is constrained so tightly by (for all intents) by an unbreakable surrounding.

The next stage of failure I thought was for a) a pinion tooth to break off or b) the pinion spline to cam out on the chuck mandrel. It turned out it was neither of those. Now, when the drillbit jams the main bevel's axle has enough slop for the teeth to slip. So for now I apply pressure on the handcrank gear right at the mesh point, and that works ok. For the wheel hub, much the same thing. It will cam out on the axle or the hub pins that engage the rim will fail.

I first became an enthusiast of binding repairs after buying a book many years ago on how to build a model turbojet engine from scratch ('Gas Turbine Engines for Model Aircraft' by Kurt Schreckling ISBN 0 9510589 1 6). In it, full engineering drawings and how to build commentary were provided.
The engine had an unconventional construction arrangement of the compressor. Rather than being milled from a piece of say 6061 aluminium, it was instead made from plywood. Yes, an 80mm diameter centrifugal jet engine fan spinning at 85000 rpm made of plywood?! It was able to withstand the stress of flying apart because the circumference was wound with carbon fibre filament, glued with CA. I was sold on binding using modern materials from that point on.

One last thing, bringing the topic back to vintage computers.
There have been posts on VCF about old keyboards failing because the square key stems have cracked at the corners. People have tried gluing the crack but there is just nowhere near enough surface area to bond, and the high-impact plastic itself may not take glue keying to its surface very well either. A further impediment is the key stem has to fit back in the key housing and move freely, so any repair needs to have a very low profile.

So I think it is completely within the bounds of possibility that an attempt at repairing these key stems by binding could be tried. It might involve setting up the key / key stem on a square mandrel and milling say 0.2mm deep channels circumferentially on the outer 4 sides, then taking the Kevlar thread and splitting it into just a few filaments to reduce the bulk before winding under tension and finishing with CA alone, applied with a sharpened toothpick.

I feel confident it can be done so if anyone has some of those 'unrepairable' broken key stems they'd be willing to send me I'd be happy to attempt to repair them for you.
 
Last edited:
Quick update about this project!

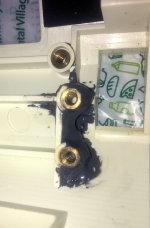
I went with JB weld for this fix. The resin was dropped because I was not sure of being able to isolate the pouring area. I don't want a leakage that would damage this rare computer! Also, the metal inserts are hollow from both ends. I was afraid the resin would find its way beneath the metal inserts and raises while pouring until it blocks the screws path.
IMG_5054 2.JPG

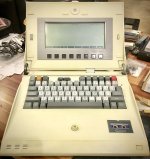
After fixing the hinges and the LCD connection, I now have a working APL "knee-top" computer :)
IMG_5057 2.jpg

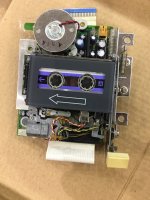
The cassette module is not working though, and it will need another round of tinkering!
IMG_5043 2.JPG
 
Back
Top