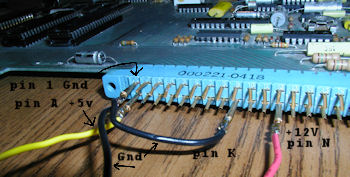
• Please review our updated Terms and Rules here

Diagnosing KIM-1 short

<snip>

The basic thing to verify is the CPU oscillator is working fine, on pin.39. Just use the scope for the that, with the Horiz set to about 5us/div and the Vert set to about 2v/div to view enough cycles on the screen.

One thing I noticed is it hard to find the original schematics for the KIM-1. All I ever see online are copies which are not exactly the same as the original KIM-1. So finding the signals on chips and their pin numbers are a chore still.

You should try to run some of the examples in the user manual
If you don't have the manual, there a copy online here
http://users.telenet.be/kim1-6502/6502/usrman.html

Will try that next....real life work calls however, must wait. I have a full page poster schematic. I did not realize these are hard to find, maybe I will scan each block and post on my site so you can download, print, and assemble your own poster.

I will put a logic probe on pin 39 and see what kind of pulse I am getting, plus compare with oscilloscope readout, will report back when I can.
b
 
Working through system..Power on 5V OK but no lights.

1. Removed shorted zener diode between application and expansion edge connectors. This solved problem with power supply (before pwr supp immediately hissed when power applied). Because my power supply is new and regulated I am told I don't need the zener, temporarily.
2. Replaced tant cap near 6502, was probably ok but it's a tant so it's a good idea to replace them when they're old just in case
3. replaced resistor near zener diode
4. getting pulse at pin 39 of CPU

At this point, applying power using a new 5V regulated supply returns exactly 5.00 volts in numerous places consistently, so now it's time to work through schematic.

1. pin 40 of 6502 goes low when RS (reset pressed)
2. It looks like a consistent wave on pin 39 and 3 on the 6502, but I'd like to see what a "good" one looks like. Mine is a slightly dirty looking wave but I don't expect a perfect sin wave either. I'd call it "probably good"
3. U16 pins 13, 12, 11 and 10 have a clock. 6502 A0/A1 have pulse
4. U4 (74145) D = nothing, A,B,C pulse after reset
5. U4 K0 = high, K5=high, K6=high, K7=high
6. transistor Q1 legs snapped off (both collector and emitter) need to replace (pnp transistor b>20 , vce>12 - 2n5371). tested base of Q2-Q6 by connecting base to ground with a 1Kohm resistor in the middle - all lit up.
7. tested 7406 in u17 using TTL tester - reports "passed".

I found some of these testing tips elsewhere on this site. thanks all.

Next - test the caps I guess.
 
You need to ground the DECEN- line which is pin K on the application connector. That will cause U4 D input to be low, and then you'll see activity on K7, K5 and K0.
 
wow. I did as you said and the KIM sprang to life ... at least now there is something on the display. I did not have pin K on the application connector grounded, I did not think I had to unless I was using the +12v...I was just grounding AA only all this time.

thanks...now to find a transistor for Q1 so I can read the most significant number of the addresses and test the ROM/RAM. When that's done I will attach to a teletype for input and storage.

UPDATE: RAM peeks shows ROM in memory matching 6530 listing, yay!

Bill
 
Last edited:
This fellow has a very nice scan of the poster. I've spent many hours looking at it.

http://www.pestingers.net/images/Antique_computers/KIM1/KIM_POSTER.jpg

(It was nice to see one of my pictures referenced earlier in this thread.)

Gilbert

I'm having a bugger of a time trying to view that webpage
I don't have any problems with other websites
Could it be that 512Kword BGP Routing Table Limit being hit again ?
Has anyone else tried that link ?
I checked with the usual "is-my-site-down" services and it says that website is definitely down
Could someone who has that copy upload it somewhere for us ?
 
You need to ground the DECEN- line which is pin K on the application connector. That will cause U4 D input to be low, and then you'll see activity on K7, K5 and K0.


oh man, I looked closer at mine again and see that now too.
It was already wired that way but didn't recognize it.
I had to look it up online in the KIM-1 User manual - the one book I don't have.
The wiring is in the Power supply section[see link]
This is a Address Decode signal for any expansion hardware
http://users.telenet.be/kim1-6502/6502/usrman.html#F22
 
wow. I did as you said and the KIM sprang to life ... at least now there is something on the display. I did not have pin K on the application connector grounded, I did not think I had to unless I was using the +12v...I was just grounding AA only all this time.

thanks...now to find a transistor for Q1 so I can read the most significant number of the addresses and test the ROM/RAM. When that's done I will attach to a teletype for input and storage.

UPDATE: RAM peeks shows ROM in memory matching 6530 listing, yay!

Bill

Glad to hear you got both of them working now
We might have to get ours all together and make a KIM-1 farm running some code for a display :)
 
ldkraemer said:
In your case, take a look at the LeakSeeker 89: http://eds-inc.com/product/leakseeker-89/

I know it expensive, but it shows you how it works. I wish I had one to play with, it did get me to thinking about cheaper solutions.

Hey, that one looks very interesting !
And it's way cheaper than the I-Prober 520
It does says it's only for dead-shorts, and not when it's a few ohms.
But it wouldn't hurt to add this on the bench.

I found a homebrew fluxgate current probe, similar to the I-Prober 520.
I'll have to look up the bookmark again. I think it was in the internet archive.

Found it, here's the link I think this is a great little project
Might want to back up this webpage in case it disappears.
http://avrs-at-leipzig.de/dokuwiki/en/prokekte/fluxprobe
 
I've used a better method of tracing shorts that even works on ground plains.
It always confuses people when I try to describe it but it can quickly find a shorted
part without anything other than some leads, a 4 digit ( prefered 5 digit) DVM and
a power supply with current limit.
One places the power supply from one side to the other of, say the ground
trace and limit the supply to about 2 or 3 amperes. ( yes, on the same trace,
not through the short ).
Place one meter lead on the trace that has the short.
With the other measure along the trace with the current flowing through it.
When you reach the short, the meter reads 0 volts.
If the supply has fingers, it may be necessary to move one of the supply
leads and probe along the finger.
On ground plains I up the current. You need to first probe one way across
the board and find the 0 volt line.
Move the supply leads to the other corner and probe to find another line.
X marks the spot of the short.
There are some other tricks like this that I use to find multiple shorts but
these are easier to show than describe in text.
Not more easter egging. You'll always know the exact cause of the short.
The voltage across the trace is so small that I've even used it to locate
a bad RAM that when soldered down was self selecting when powered up.
You just have to make sure the supply is isolated.
Dwight
 
I'm try to do that some time.
I can get my son to be camera man and he
can plant a short on the board and cover it
so I can't see it.
That should make it more official.
Dwight
 
Dwight,
Ive got a couple of questions about PS & Meter settings for your method.

I understand that you first make sure the Power Supply is isolated, no Earth Ground.

1. What is the voltage setting on LAB Power Supply, along with the ~2 Amp setting for Ground Plane testing?
2. Is the DMM DC Voltage setting on Auto Ranging or fixed for .000 Range, or does it matter?
3. If you are working on an Address Line or Data Line Short versus along the Ground plane, is the PS Voltage same as for Ground Plane & current still ~2 Amps?

I too would love to see a video of how it works.

Thanks.

Larry
 
wow. I did as you said and the KIM sprang to life ... at least now there is something on the display. I did not have pin K on the application connector grounded, I did not think I had to unless I was using the +12v...I was just grounding AA only all this time.

thanks...now to find a transistor for Q1 so I can read the most significant number of the addresses and test the ROM/RAM. When that's done I will attach to a teletype for input and storage.

UPDATE: RAM peeks shows ROM in memory matching 6530 listing, yay!

Bill

Link to photo of power leads (note this happens to have been taken while attached to my other KIM, a rev G.):
thm_KIM-1_Application-Connector-Power.jpg

http://vintagecomputer.net/commodore/kim/KIM-1_Application-Connector-Power.jpg
 
Last edited:
Not meaning to hijack the thread. I usually set the voltage to about 1/3V.
Once connected it will only be 100 to 200 mv.
The meter must have a 100 or 200mv range. I use a 5 digit Fluke but it
is all about getting enough drop to measure a voltage across the trace or board.
For ground planes I like to use 5 to 10 amperes. This may rerquire soldered
wires rather than clips, depending on the clips used. These are best at the corners
of the board.
Most traces can handle 1 to 2 amperes, even smaller ones. 0.200 volts at 2 amperes,
across 10 inches of trace is only .04watts per inch. Not enough to worry about.
Dwight
 
This fellow has a very nice scan of the poster. I've spent many hours looking at it.

http://www.pestingers.net/images/Antique_computers/KIM1/KIM_POSTER.jpg

(It was nice to see one of my pictures referenced earlier in this thread.)

Gilbert

If you're having trouble downloading the poster, the Wayback Machine has it too.

https://web.archive.org/web/2007121.../images/Antique_computers/KIM1/KIM_POSTER.jpg

I also put my own mirror online at http://goudsm.it/KIM_POSTER.jpg

Be patient: the file is 40MB big!

===Jac
 
Back
Top