• Please review our updated Terms and Rules here

DS1287 Rework. How Am I Doing So Far?

Lest anyone accuse me of being over-cautious in my recommendation to remove the chip before working on it, bear in mind the experience thus far with the Unisys laptop. :)

No offense intended, just relying on the track record thus far.
 
I've cut in a little farther into the chip, but I don't see any pins yet!!:confused: I cut into another DS1287 with a Dremel a while back and never did get to the pins, even though I cut almost halfway into the pin. Can the exacto knife cut the pins or part of them off or am I just getting to scared about damaging the chip???
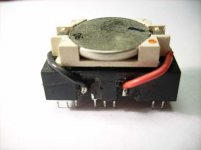
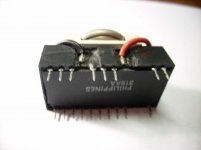
Looks like you're digging down from the top, but the pins you want are near the bottom. Have a look at Tez's blog, or here's one of mine:

DS1287a.JPGDS1287b.JPG
 
I've tried this mod in the past, and was only partially successful. I was able to expose the two pins without destroying the chip or making a huge mess....but I wasn't able to get my solder to stick, nor was I able to find a good adhesive to attach the battery holder to the top of the battery. I think I used multi use epoxy. What do you guys recommend for solder and glue?
 
Looks like you're digging down from the top, but the pins you want are near the bottom.
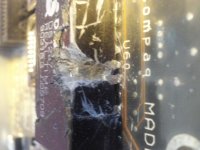
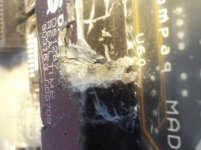
I've got it to where I can dig in from the side. On your pictures, it looks like you didn't get the pins exposed all of the way, but soldered the wires to the metal that was showing.

If you can make it out, there is some metal exposed in the middle. MikeS, from your pictures, this looks like where you soldered your wires too. I'll try to chip away at it a little more and see what else I find.:)

Zi6_0424.jpg Zi6_0426.jpg
 
Lest anyone accuse me of being over-cautious in my recommendation to remove the chip before working on it, bear in mind the experience thus far with the Unisys laptop. :)

No offense intended, just relying on the track record thus far.
I would remove it, but Compaq made the lovely decision to SOLDER it on the board.:mad: And the Unisys laptop. (sigh) A dead laptop plus drivers don't mix. And I learn all of this the hard way!
 
I still don't understand why you can't desolder it. Use a cheap radio shack solder sucker. Works wonders.

If you are really intent on mounting your own battery, order a DS12c885, 32.768 KHz crystal oscillator, battery holder, and .6" 24 pin DIP socket and do a complete swap out. I just don't understand this effort I guess.
 
...If you are really intent on mounting your own battery, order a DS12c885, 32.768 KHz crystal oscillator, battery holder, and .6" 24 pin DIP socket and do a complete swap out. I just don't understand this effort I guess.
Sounds like a lot more work (and money) to me...

A Dremel tool, battery & holder from a scrap M/B, and a half hour or so is all ya need.

But to each his own...
 
MikeS, from your pictures, this looks like where you soldered your wires too. I'll try to chip away at it a little more and see what else I find.:)
Yeah, the connections are halfway down the side, below the battery and above the chip, above pins 16 and 20.

The picture in the original article showing the whole top and side cut away shows it clearly.
 
As for risk...depends on soldering/desoldering skill, vs hand tool skill and control. I think the majority of people will find it much easier to burn PCB traces beyond repair than to hit the board with the saw hard enough to break traces...since I have tried to intentionally break traces in some situations and found them far more resilient than to be damaged by a single, accidental-force impact.

Here is the first one I did, way back when, the one that punctured my finger. I realize neither the camera pic or the flatbed scan are perfect, but it gives you another reference point to work from (they all look the same, but hey, maybe it'll help)

ds12887reworkpic.jpg


ds12877reworkscan.jpg


Note that the composition of this module is a DIP chip with stuff piled on top of it inside. Generally, then, the best place to try to make contact with the upwards-bent pins is as far down the side as possible. With a soldered-in module, this does get difficult...it would be important to make sure you don't break the pin off the side of the IC itself, or it's junk.

Also hot glue works well to stick the socket on top. And yes, those are seriously bad solder joints, but they work. This module is still working after I hacked it up a couple years ago, same battery, and if I pop it into my Model 30 286 it will not throw an error about configuration lost/dead battery etc because it is holding the settings still. That machine contains another hacked module currently, IIRC.
 
Last edited:
Kishy, I've broken motherboard traces by simply dropping a screwdriver from 6" onto the board. Maybe this board isn't too bad, but some P1 era boards will give you the willies with fine, closely-spaced traces.

I never burn boards--the trick is a good temperature-controlled iron and liberal application of solder, even while desoldering.
 
If I don't see a pin soon, I think I'll resort to soldering. The only thing is, how am I supposed to unsolder and solder those pins that are SOOOOO close? This is geeting to be quite a task!:) I'll work on it tomorrow.
 
MikeS says this operation takes about 1/2 hour. In that time, I could take out the old module, put a socket in, put a 12887 module in (Futurlec.com, 5.95 + 4 shipping) and have a coffee (if I drank coffee).

I don't think breathing burning epoxy fumes is really that good for you either.
 
Why is the epoxy burning? Manually saw or hack it out.

There's a principle involved too...it's kind of ironic that people who would endorse the maintenance and repair of older systems would advise the complete replacement of something that is totally repairable, particularly considering that through the course of that repair, it is actually improved.

OP, carry on as you are. If you succeed, awesome. If you damage it beyond salvation, then consider the options for replacement.

Me? Even if I got a brand new module, I'd disconnect the internal battery and connect an external one.
 
Why is the epoxy burning? Manually saw or hack it out.

There's a principle involved too...it's kind of ironic that people who would endorse the maintenance and repair of older systems would advise the complete replacement of something that is totally repairable, particularly considering that through the course of that repair, it is actually improved.

Well, most people would be using a Dremel and then digging at it with a soldering iron.

What principle would that be?

A new 12887 is probably going to outlive the computer which, having old parts, is going to continue to have breakdowns.

A resistor is totally repairable as well, as long as you use a thickness and length of wire that has the same resistance, but I wouldn't do that either.

As for "better", how does that work? It's an ugly, messy kludge and hardly makes the piece look authentic. When any of my socketed 12887s craps out, the owner of the equipment can just replace it with another or whatever is available at the time.
 
As I've already stated, if you want an external battery, why disassemble a 887? Just buy the components that are in it (885, crystal, and battery) and hot glue it all together in a big wad. If this exercise is just a that, an exercise, then keep ignoring my comments.

And I still don't get the advantage of having an external battery holder when a 887 will last another 10+ years and they aren't going to stop making them anytime soon for this very reason. That and it's almost pure profit for Maxim.
 
I still don't understand why you can't desolder it. Use a cheap radio shack solder sucker. Works wonders.
I'm not sure what the board in question is like here but I know for my compaq SLT/286 many of the components were surface mounts, the traces were tiny and very close together. Modding the battery on the board was not without risk but I deemed it the less risky of the two...and I'm a fairly dab hand at desoldering.

Tez
 
As I've already stated, if you want an external battery, why disassemble a 887?
We're not talking about "disassembling an 887", we're talking about replacing the battery in a DS1287 (or equivalent).
Just buy the components that are in it (885, crystal, and battery) and hot glue it all together in a big wad. If this exercise is just a that, an exercise, then keep ignoring my comments.
Well, it's not just an exercise but I'm going to ignore your comments all the same, so no need to repeat them again. ;-)

I wouldn't think of commenting that it doesn't make sense to spend $10-$25 on an old junker and wait two weeks for delivery when for the price of a battery (which I have in my junk pile) I can have the system up and running in 15 minutes or so; depending on the system I might in fact myself opt to replace the chip, but why are you (eeguru) and Druid so bothered by Tez, kishy, myself and the OP choosing to do it the cheap and quick way sometimes? Do you have shares in Maxim? ;-)

Presumably the OP knows his options and the risks but has decided to replace his battery in situ, and those of us who have done it are offering support and advice; is that a problem for you?

I'm constantly amused by how often folks are patronized in this hobby for choosing "different" ways of doing things, whether it's the tedious Apple vs. PC/Windows vs. Linux nonsense, or replacing a battery vs. replacing a chip... If you don't understand maybe that's just a lack of imagination...

[sarcasm]Why bother repairing that old clunker anyway? Why not just buy a new one...[/sarcasm]
 
Last edited:
I've done this rework twice myself. The first time worked out great (though it did not look as nice as Tezza's or MikeS') and the second time I almost destroyed the thing trying to find the pin.

The first one was soldered to the motherboard, so I did it very carefully, the second one was socketed and I think this is why I was not so careful.

As to why do this then simply buy a new DS1287, well is for the joy of hacking more than anything. Yes a replacement part is not that expensive, but buying it and slapping it into a socket lacks any feeling of accomplishment. And if it is soldered to the board, then I say cutting into it is far less risky than de-soldering and re-soldering the thing.

More power to the OP for going this route, and if you destroy the chip, then you can simply solder on a socket and buy a new one.
 
I think I've qualified every comment I've made in this thread with (to paraphrase) 'if you're doing it just because, more power to you'. Just trying to offer a less painful route in an off-the-shelf 885.
 
Back
Top