dutchacorn
Experienced Member
Recently I got 2 HX-20s off eBay. My curiosity was triggered by the "Mitutoyo DP-20" labeling on one of them. Neither of them work, this thread is to document their repairs. It can take a while because time is scarce but it may help others track down faults. It will probably help me document what I've tried. It was quite obvious a previous owner had worked on them. The keyboards were swapped between the units, batteries removed and some of the parts were in a separate bag.
The Mitutoyo is a custom machine, more pictures information on the ROMs and expansion module posted on the stardot forum here.
Symptoms and analysis so far:
Mitutoyo
Epson

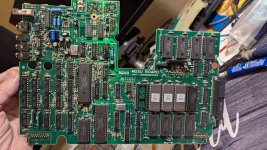
Mitutoyo MOSU board


Epson MOSU board


The Mitutoyo is a custom machine, more pictures information on the ROMs and expansion module posted on the stardot forum here.
Symptoms and analysis so far:
Mitutoyo
- Older MOSU board, several patch wires, BASIC version 1.0
- Keyboard / LCD unit (top part) is faulty. Has marks of battery leakage on the FPC cable between the keyboard and LCD PCBs.
- When using a known-good keyboard, it starts up, BASIC works. When using the soft-switch to switch it off it often hangs or falls into a TRAP. A reset brings it back.
Epson
- BASIC version 1.1
- Keyboard / LCD unit (top part) is faulty. Has marks of battery leakage on the FPC cable between the keyboard and LCD PCBs.
- When using a known-good keyboard, it starts up with the beep-beep but has no video output. BASIC works (can enter a SOUND statement). When using the soft-switch to switch it off it also seems to hang. A reset brings it back.
Mitutoyo MOSU board
Epson MOSU board