• Please review our updated Terms and Rules here

Osborne I - no disk drive response

Here we go!

Pins 1 and 20 are indeed connected.

But (!), pins 6 and 14 (the 3rd and 7th on the bottom row) are connected also. Continuity established with no keys pressed.

Photo, with the two bad pins marked:
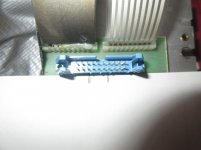
IMG_0452.jpg

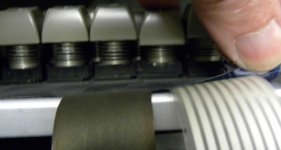
Could someone please tell me what key that would correlate to? I think it's T. I'm new to the matrix game, and don't want to mess something else up by dis-assembling the wrong part(s). I've got the keycap off, but I'd also appreciate knowing how to take that key apart, and what I should be looking for.

Thanks.
Tom M.
 
Last edited:
Assuming we are all on the same page (!) I also get a 'T' (and I didn't read your full post either until just now - so I didn't see your answer).

Before you start taking things apart - just operate the 'T' key a few times and see if it 'feels' different to some of the other keys.

Let's also think a little bit before doing something we may regret. We have a clue as to what we think the problem is (and a pretty good clue at that).

Dave
 
Good. Our analyses are in agreement!

I have give the T key a few comparisons with other keys. Feels exactly the same; same resistance, save movement, same return action. Also sits the same height as the other keys, and doesn't lean or wiggle.

I also did some rapid typing, then moderate shaking, and blew compressed air into that area under the keys. No change - those two pins are still constantly "connected".

Thanks.
Tom M.
 
If it was me I would checkout all of the other keys in the matrix (with your multimeter) for correct operation - but avoiding the row and column that 'T' is on (pins 6 and 14).

Make sure everything else is OK - and you understand the matrix arrangement of keys. Getting a lot of positive results would be good. After that we can test the other keys joined to pins 6 and 14.

I know it is not fixing the 'T' key - but I would prefer to know that everything else is working correctly and we are not leading ourself up the garden path!

In the meantime, I will checkout the internet and see if I can find any websites or videos about fixing the individual keys themselves.

Failing that, there are a number of Osborne employees around (and the designer himself if I remember correctly) who may be contactable.

Dave
 
I will checkout the internet and see if I can find any websites or videos about fixing the individual keys themselves.

Failing that, there are a number of Osborne employees around (and the designer himself if I remember correctly) who may be contactable.

Dave

If it is the same Oak keyboard that I have, it would be extremely difficult to repair a key
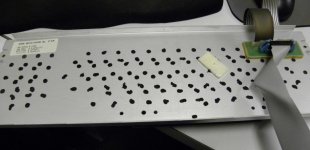
It is a membrane keyboard
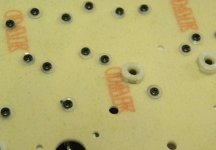
All of the black spots are plastic tabs that have been melted down

membrane.jpg

oakkb.jpg
 
That's what I thought, and then found this website https://deskthority.net/viewtopic.php?f=62&t=7933&start=

Slight drawback however... it talks about removing the switch mechanism, not putting it back together again! This looks like an irreversible process!

Dave

you could glue it back in, or use very small screws, drill small holes into what remains of the tab and carefully screw them in

I did this with a Qume membrane keyboard for all 100+ keys. It was no fun.

qume1.jpg qume2.jpg
 
Well now *this* is getting interesting!

As I mentioned earlier, I found a tiny spring under some duct tape inside the keyboard case. That's exactly the tiny spring shown here:

https://www.flickr.com/photos/123564336@N03/14110304343/

which is on this page:

https://deskthority.net/viewtopic.php?f=62&t=7933&start=

I don't know how that actually operates - what does the spring do to close the circuit? and if that tiny spring is missing in the T key, would the matrix be "closed" at that intersection, or "open"?

Again, I haven't removed the T key unit, so I don't even know if the spring I found is part of the T key unit. Note that the Deskthority page mentions how the spring(s) affect the feel of the key. All my keys, including the problematic T key, feel and operate exactly the same.

By the way, I did check for problems with all the other pin combinations. The only bad one is the T key pin combination.

Thanks.
Tom M.
 
The melted plastic "tabs" are removed in that area on the back of the mounting plate, and the keycaps are off.

The Deskthority article refers to "popping" the key unit out.

Would anyone know what I'm supposed to lift to pop it out? Here's where I am:

IMG_0456.jpg

I'm doing a pretty good job of mangling it all up as I try!

Thanks.
Tom M.
 
This is all guesswork here...

I suspect the large (external) spring is the one that pushes up the key top itself. When you apply pressure to the key - this will be the bulk of the resistance force you feel.

I suspect the little (internal) spring is the one that presses on the membrane when you press the key top and forces the top and bottom of the membrane together - thus making contact.

My though would be that if the little internal spring was broken - that the switch contact would never be made - but I wonder if there is a possibility of it getting jammed somewhere and forcing the contact closed?

I would think the entire (black) assembly should just lift off the baseboard if you have released the two plastic tabs from the underside.

Photographs 2 and 4 at https://deskthority.net/viewtopic.php?f=62&t=7933&start= should be the ones to look at.

Dave
 
Here's the latest - I got the key unit out. After you scrape off those melted tabs, you can use a toothpick or tiny screwdriver to just poke the unit loose. Of course, camera battery died, so I can't make more photos for an hour.

The surface of the matrix under the key looks burned or overheated. A bluish silver blotch, not a definite shape like a circle, more just like melted candle wax.

Appearance similar to:

http://i.imgur.com/rA9DUN1.jpg

I tested the shorted matrix pins again (3 and 15), and the problem continues. So to me, the matrix has died a sad and lonely death. Unless I can find a reference on repairing that spot, I guess my O1 is no longer usable, at least until I can find a replacement keyboard.

Tom M.
 
I would be interested to see a photograph when your camera batteries have recharged - I have an idea...

Dave
 
The plot thickens!

I also removed a key unit in the row above the T.

There's the same "burned" appearance to the matrix under that key, but that key has no problem.

So ... seems there's not a correlation to the matrix appearance and the "short circuit" problem.

I'm interested in hearing Dave's idea!
 
I suspect that there is some contamination of some description that (over time) causes either growth or degradation to occur within the membrane key(s). You may be lucky in that some (or all) of the keys are degrading - but it is just the 'T' at the moment that is causing you problems.

I am wondering if the blue/green is copper?

My thought (if it is contamination that has caused an internal short circuit) is to get a scalpel and very, very carefully cut a slot in the membrane in the vicinity of the 'T' switch - avoiding the switch matrix traces. Through the small slot insert a flexible piece of plastic - just enough to insert itself between the upper and lower switch contact (enough to break the circuit so to speak).

OK, this gives you a keyboard without a 'T' key - but it at least will enable you to test the keyboard. You could then add the 'T' key back in separately, making the electrical connections at the connector somehow (to be determined).

This is all supposition though at this point!

Dave
 
OK - here we go. Camera working again.

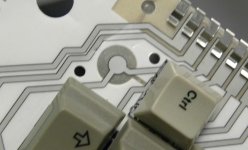
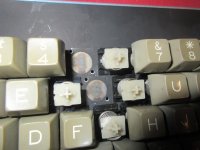
Here's what I found under the problematic T key, and the unproblematic 5 key. Note those membrane areas look the same.

IMG_0457.jpg

Here's a similar area in the same type (Oak FTM) keyboard, from the Desktopia (?) site:

Membrane matrix.jpg

That one appears "clean and tidy" - with no discoloration.
 
Okay, back on this thread, instead of the "wanted" thread. (You need a program to follow this discussion). The discoloration might just be tarnishing of the silver plating, which would not be unexpected after all this time.

I suppose you could penetrate the membrane with a pinhole at the key and squirt in some contact cleaner to see if that dislodges anything.

FWIW, what's the resistance of the "short", if it hasn't already been mentioned.
 
Thanks Chuck. You're the first person who's mentioned silver plating. Is that what the surface is?

I can find no description of what that "membrane" actually consists of - so I don't know what could be causing the problem. Note that both the "bad" area and the "good" area look the same.

Tom M.
 
The membrane is undoubtedly mylar and the traces are printed with a special silver-based ink. I used the term "plating", but that's not factually accurate. If you think you can get the whole shebang back together after disassembly, sometimes the membranes can be repaired.
 
It looks as though it is dying from old age. These things were never designed to last this long...

By gently squeezing the exposed area of the removed '5' key - you should see the matrix row and column for the '5' become connected. As Chuck has asked - what is the resistance of the '5' key when it is released and depressed?

Try the same with the 'T' key. Can you see a change in resistance when you apply some pressure to the 'T' area?

Now Chuck has mentioned silver that makes more sense than my copper! I was thinking of flexible PCBs...

If you can get the membrane part of the keyboard to work again, then you may be able to pop the key mechanism back in and use a glue gun; glue (or something similar) to reattach the key mechanism itself back into place. I think Al mentioned a small self-tapping screw (and I would use a small insulating washer on the screw).

Dave
 
Back
Top