• Please review our updated Terms and Rules here

Packard Bell PB70 Switching Power Supply Repair

oldpcguy

Experienced Member
Joined
Sep 23, 2021
Messages
376
Recently I purchased a Packard Bell 386sx desktop which is experiencing low voltage, approximately 10 volts, on the +12 volt rail. The +5 volt rail is reading 5.1 volts which I consider to be within spec. Does anyone know where I can find schematics for this power supply? Or have any suggestions on what to check in order to bring this rail back into spec? I have a general familiarity with switching power supplies.

The symptoms point so something wrong on the low voltage side. A cleaning and inspection of the components did not reveal anything that looked bad. I'll start by tracing the +12 volt wire back onto the PCB but wanted to reach out to those here to see if they had any suggestions.
 
When I was trying to get my Columbia Data Products VP working, we discovered I was getting 8V on the 12V rail when under load. They suggested capacitors as the likely culprit. Unfortunately I haven't revisited that machine yet, so I can't tell you if that was the solution. But I have noticed a trend in the repairs I've done over the past couple years: old capacitors fail and they don't always have any visual signs of failure. I doubt that supply has tantalums, but if it does, check those for shorts or excessive resistance. When tantalums fail, they short. But sometimes they don't short completely and instead cause excess resistance on the circuit, which could cause the voltage drop you're seeing. So far, I've repaired all of the following machines by replacing various bad capacitors:

  • Sharp PC-7100 - Had no power at all, initially. Found the A/C input connector had a cracked solder joint. After repairing that, the supply emitted a loud, low pitched buzzing sound and the low voltage output was all over the place. Found out the hard way that one of the large filter caps had failed internally and the buzzing I heard was A/C power arching from the electrode to the capacitor's casing. I was touching components to see if any were hot after removing power and got a hell of a shock from that cap. Replaced both filter caps and the machine works great now.
  • Compaq Portable - Had no power at all. Disassembled and found an obviously bad tantalum as it had exploded and left scorch marks on the casing nearby. Replaced and checked all the other tantalum caps and found another was shorted on the floppy controller board. Replaced that as well and the machine works great now.
  • NEC Powermate SX - Booted but had no display. After checking that external displays worked, I inspected the board on the back of the gas plasma display. I discovered an electrolytic cap on the high voltage rail had failed and was leaking. Replaced and the display works perfect.
  • IBM PS/2 P70 - I have two of these and both had bad surface mount electrolytic caps on their floppy drives. It caused the drives to fail to recognize disks. Unfortunately I destroyed the first drive in an attempted repair and had to replace it. But using a different approach on the second drive was successful and it now reads fine.
All that to say, I'd check the caps first lol. I'd start by visually inspecting them for bulging tops or leaking electrolytes at their base. If they all look good visually, the only real way to test them for sure is to remove them and test them with an ESR tester, unless someone else knows a way to do it in-circuit. I'd also suggest looking for any components that a discolored or that has discolored portions of circuit board around them. Things that cause excess resistance tend to get hot. Hot components usually darken or cause the board around them to darken.

Good luck! Wish I could be more help.
 
Thanks Coder. My first thought was capacitors and my intent was to replace them but wanted to reach out to the community to see if anyone had any other suggestions. I do have an ESR meter and can test the caps to see if any fail. My preference would be to perform a surgical replacement instead of replacing them all. But it won't hurt to just replace them all. This solved a problem with a PS/2 Model 70 which would power up and then shutdown after a short period.

I too had replaced the caps on the Model 70 floppy drives. Like you I also ruined one (I think one of the ribbon cables tore slightly. Since it could not be removed so I could repair it I had to write it off. Out of three I was able to get one working drive. I bought new CMOS battery, configured the system, then promptly gave it away on Craigslist as I didn't want to deal with the Micro Channel PS/2 systems any longer.
 
When tantalums fail, they short. But sometimes they don't short completely and instead ...
And they also fail open-circuit.

... cause excess resistance on the circuit
Technical: The overall resistance presented to the voltage rail decreases, resulting in greater 'attempted' current draw.

If anything is going up, it is the load. Resistance decrease = more loading. Resistance increase = less loading.

I used "attempted" earlier, because what happens depends on the combination of make-model of power supply, and the amount of additional loading.
For combination XY, where the power supply is fully functional, some possibilities are:
- The additional loading is within the rated load capability of the voltage rail (the output voltage remains the same).
- The additional loading is outside the rated load capability of the voltage rail, to the point that the particular power supply shuts down, blows a fuse, etc.
- The additional loading is outside the rated load capability of the voltage rail, but not by much, and the output voltage drops slightly. (Depends on power supply design.)
 
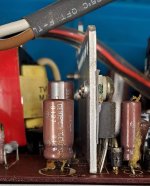
UPDATE: I was finally able to get around to examining this power supply further (after having just completed a repair on an Apple II system). What I found were a couple of electrolytic capacitors which have leaked (all the others look to be OK). In order to replace them I'll need to remove the PCB from the case of the power supply (which doesn't look difficult but it's not trivial either). Since I'll be in there I was thinking I should just replace all of the electrolytic capacitors instead of just the two. However doing so will require me to obtain each individual capacitor as I am not aware of any kit. This will take some time whereas just replacing two should be quick and easy.

Q: Should I replace all of the electrolytic capacitors? Or just the leaking ones?

PB_386sx_Bad_Caps.jpg
 
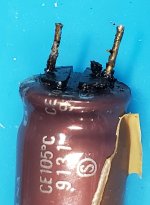
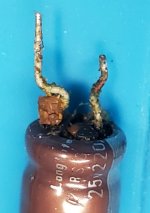
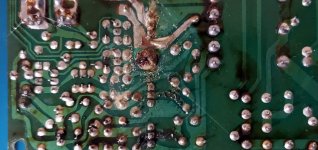
After removing the PCB and examining the capacitors closely the answer became self evident: Replace all of them. I removed all of the electrolytic capacitors and several of them were or had started to leak. Testing each one with an ESR meter revealed that six of them failed. Here are pictures of a couple of the bad capacitors along with the underside of the power supply PCB board. I must say that I can see where Packard Bell earned its reputation as a low quality supplier given the amount of flux residue on the PCB.

20231017_061256s.jpg

20231017_061326s.jpg

20231016_172735s.jpg
 
You'll definitely also want to wash the entire PCB a few times to get all of that corrosive and conductive electrolyte off.

I'd recommend CRC Lectra clean for the first cleaning, blast the whole board and scrub it good with a brush. You can also soak just the PCB in alcohol for an hour or two and then wash it with dish soap for the final wash and dry it with a fan or compressed air.
I did clean the PCB with isopropyl alcohol to remove the electrolyte (and some of the flux residue, I can't believe how much flux residue there was on this from the factory). I also used flux and solder-wick to clean off the pad contact surfaces.

I order the new capacitors yesterday so hopefully this will be repaired in the next week.
 
Were all the caps ELNA branded ones like the couple in photos? Those are indeed awful nowadays. I don't think they were low-quality when new, but their seals just always fail with age. You're lucky all things considered that that thing was able to be fixed, the goop from those can be incredibly destructive.

If you see the distinctive top vent style of an ELNA cap, replace it.
 
Last edited:
Were all the caps ELNA branded ones like the couple in photos? Those are indeed awful nowadays. I don't think they were low-quality when new, but their seals just always fail with age. You're lucky all things considered that that thing was able to be fixed, the goop from those can be incredibly destructive.

If you see the distinctive top vent style of an ELNA cap, replace it.
I am replacing all of the caps with Nichicon. All of the ELNA caps leaked and are they are the six caps that failed on the ESR meter (no surprise since they leaked).
 
UPDATE: The new capacitors did the trick. Both the +5 volt and +12 volt rails are where they need to be. The hard disk now spins up (it did not before due to the low voltage on the +12 volt rail). There was a little speckling on the display (as if the VGA connector was loose or dirty) which has also cleared up (I assume this is due to better power on the +5 volt rail).

After seeing this power supply I am going to pull the 80486 systems power supply and recap it. All in all this recap cost ~$25 (it would have cost ~$15 but one of the resistors fell off and I had to pay ~$10 for one resistor).
 
Ah, yep. You've been hit by the Elna bug. Pretty sure the Elna caps used in most PC gear that harbored them from the late 80s into the early 90s for them were all affected by the quaternary ammonium salt/compound issue from the cap plague of that time. Powerbook 100 series power bricks are also subject to this problem and the leakage can be downright catastrophic, especially since you need to put the casing in a vise in order to crack the ultrasonic welds. By far these are the smelliest caps to replace and also some of the nastiest to clean up after. By the end of the 90s Elna figured itself out though, and made some pretty darn good audio-grade capacitors in that era and going forward.
 
Back
Top