• Please review our updated Terms and Rules here

PET Video Generator

I started on the 12", CRTC, 20Khz, 50Hz version. Got most of the timings but not sure about the number of visible lines.

Of the 400 lines in one frame, any ideas how many are blank and how many carry the visible video?
 
Visible video is only 200 lines.
8x8 characters
40 columns = 320 pixels wide (8Mhz pixel clock)
80 columns = 640 pixels wide (80 col has 16Mhz pixel clock)
25 lines = 200 pixels high
Note, 80 col CRTC pets add a blank line between characters which probably adds another 24 or 25 lines.
 
Last edited:
Visible video is only 200 lines.
8x8 characters
40 columns = 320 pixels wide (8Mhz pixel clock)
80 columns = 640 pixels wide (80 col has 16Mhz pixel clock)
25 lines = 200 pixels high
Note, 80 col CRTC pets add a blank line between characters which probably adds another 24 or 25 lines.
From rough timings I did on an 8032, it looked like there are about 80 blank lines, followed by 240 video lines, followed by 80 blank lines to make up the 400 li e.

But this is a bit of a guesstimate, could easily be a couple of lines off in any direction.
 
A bit of an update on this project. As posted above, the intent was to create a small circuit that can generate a test screen to help repair the various PET monitors without having to have an actual PET on the test bench.
.
First attempt was to generate the signals using an Arduino and that (kinda) worked, but with an issue where the Arduino's timing - in servicing the relevant interrupts - is not very stable. This caused the H-drive period to fluctuate a bit leading to an unstable display. The answer would be to either go to a lower level language to get tighter control of the timing (like @tsky did above) and/or using a faster processor. Unfortunately, I'm pretty useless at assembler on these micro-controllers and also did not have faster ones (like an ESP32) at hand.
.
Thinking how I would've done it in the 80's, when micro-controllers did not exists and we did stuff with logic gates, had me slap a quick circuit together with a 1MHz oscillator driving a binary ripple counter (2 actually, 2 x 4040s to give 24 bits) that then drive the address lines of a ROM, a 29EE010 EEPROM in this case. Using D0, D1 and D2 of the ROM's data outputs, allow you to re-create H-Drive, V-Drive and Video with a 1us resolution. D3 is then used as a Reset signal to keep it running in the correct timing loop. Lastly, a buffer (4049) directly drives the PET monitor input signals.
.
Circuit Layout.jpg
Pretty simple and rock solid in the signals generated. But now you need to program the ROM with the right data to accurately recreate the signals. Fortunately I've got a friend that's absolutely amazing at this kind of stuff, and he wrote a GUI that allows you to design the screen you want to see on the PET monitor, and then create the ROMs image, also ensuring all the timings are spot on.
.
This was the first attempt, just vertical bars (the different colours effectively represent the different signals needed) and it works brilliantly.
WhatsApp Image 2023-07-06 at 18.03.22.jpeg WhatsApp Image 2023-07-07 at 01.03.31.jpeg
.
Off course, now that we can create essentially any image within the 1us timing, we got carried away a bit. :)

WhatsApp Image 2023-07-07 at 00.18.08.jpeg 20230707_011303.jpg
.
And, lastly, something the peeps from the 70's and 80's will remember, a well known Commodore 'personality' :)
WhatsApp Image 2023-07-07 at 00.24.44.jpeg 20230707_013349.jpg
.
Will do the same for the 12" CRT and just put a dip switch on the top address lines to select between 9" and 12" and different images.
 
Last edited:
This is very very good, I really like what you have done here.

A similar method was used by Jon Evans & Peter Brown back in 2002, I have one of his generators for vintage 405 line TV's. I programmed the ROM in my unit with a picture of my wife to act as the test pattern image, not dissimilar to the Commodore image. His one used software that converted a .BMP image into the ROM file which made it super easy to program.

In his case, a greyscale image and "analog" video was obtained by stringing a DAC on the ROM outputs and the ROM generated the sync too. (Not needed for the PET VDU of course as the video is on-off, but this system/idea is handy for testing composite analog style VDU's, if one did not have a Television test card generator or a generator with the correct H & V sync rates for the VDU in question)

his website :


I have attached a photo of the inside of the unit I built, hand wired on Japanese plated through hole spot board. The only thing I changed on the design was the output system, did not use the transistors and instead mixed the syncs & video at the input of an OP amp seen in the upper left corner. It pays to put the ROM in a ZIF socket.
 

Attachments

  • 405line.jpg
    405line.jpg
    174.6 KB · Views: 13
  • 405line2.jpg
    405line2.jpg
    1 MB · Views: 11
Last edited:
Measured the video signals on my 8032 12" CRTC, 50Hz, 20KHz. Signals are as follows;
.
V-Drive: Negative pulse of 800us, every 20ms (for 50Hz)
H-Drive: Negative pulse of 15us, every 50us (for 20KHz)
H-Drive goes low, 9us before V-Drive goes low
.
Video: Active high, goes high, 10us after H-Drive goes low, 1 full line is 40us
.
There are 400 lines of video of which the first 80 lines are blank (i.e. Video starts 4ms after V-drive goes low). Then there are 250 lines of active display, followed by 70 blank lines (i.e. Video ends 3.5ms before next V-Drive goes low)
.
Programmed these timings into the upper half of the ROM and can now drive either monitors by just flipping the top address line on the ROM.
.

12-inch-00.jpg

12-inch-01.jpg 12-inch-02.jpg
 
Visible video is only 200 lines.
8x8 characters
40 columns = 320 pixels wide (8Mhz pixel clock)
80 columns = 640 pixels wide (80 col has 16Mhz pixel clock)
25 lines = 200 pixels high
Note, 80 col CRTC pets add a blank line between characters which probably adds another 24 or 25 lines.
@Hutch , can confirm it's 8 lines per character, followed by two blank lines.
.
In this trace of a 8032 screen filled with Char 224 (the solid block), you can see the 8 lines that are high, followed by two blank lines. Video is Purple and H-drive is Yellow.
.
20230708_163958.jpg
.
That gives us 10 lines per character, for 250 lines total.
 
If you make a test pattern with small squares and compare the horizontal linearity of the scan between the 12" and the 9" VDU you will see much better linearity with the 12" VDU, the main difference being that the squares will be stretched horizontally on the left side of the scan with the 9" VDU, that is, if it is the version without the linearity control, which most seem to be.

This generator should be part of every PET repairer's tool kit !
 
Picking up on this again to add support for the 8296 and 8296D.
.
This is the circuit diagram on Zimmers stating 8296, 8296-D and 700. I suspect it's maybe not applicable to the 8296 (non-disk version), as my unit have normal AC running to the monitor, ala the 8032.

Screenshot 2023-07-15 104206.jpg 20230409_114829.jpg
.
Q1: Is the 8296 monitor the same as the 8032 12"? Specifically in H-drive, V-drive and Video frequencies and polarities? (Mine must be fixed still, then I'll be able to measure it.... :( )
.
Q2: For the 700 monitor circuit above, it looks like H-drive is around 18KHz/54.4us. Does anyone have the screen geometry in terms of lines, etc. like @Hutch posted above for the 8032? 54.4us implies fewer than 400 lines but, @ 367.6, it's not an integer of the 20ms V-drive.
 
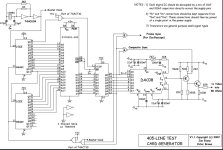
While drawing the circuit in KiCAD to make a PCB, I realised that you can put 5 video images in the ROM in successive Data bits (D0 - D4) as they all share the same H-Drive (D5) and V-Drive (D6) signals. Switching between them, gives you 5 different test images within the same data file.
.
Screenshot 2023-07-23 163210.png
.
So, a bit frivolous, but if you can automatically switch between them, you could create simple animations. Did this one just for fun :) Basically I wired up a electronic switch in place of SW3 in the circuit above, using some components I had in the workshop (4017 and 2 x 4066s). My clever friend made 5 images of the ball below, offset by the correct angle to create a spinning ball animation.
.
ezgif.com-crop.gif
.
Couple of notes on the circuit:
- Clock is 1MHz which gives you a 1us resolution, which is fine to draw typical static test patters. It does mean the 9" monitor will have an effective resolution of 40 x 200, so graphics like this spinning ball will not look very good. Every doubling of clock will also double the horisontal resolution but then leaves less space for multiple ROM images.
- Added Dip-switch selectable inverters on the output signals, if you ever need to invert any of the signals.
- Added support for MDA, CGA and EGA (still untested).
- Board will work with any 1, 2 or 4Mbit EPROM, Flash or EEPROM. The bigger the ROM, the more test images/monitors can be supported.
- With a 4Mbit ROM, you should be able to get 8 different timing maps, so you can support up to 8 different kind of monitors. So far, for PET, I've got 9" 60/15625, 12" 50/20000, and will add 8298 and 700. For PC monitors; MDA, CGA and mode 1 and mode 2 EGA. If you use a monochrome monitor, you can select 5 different video outputs, so - in theory, you can have up to 40 different images for a single monitor. A bit silly, but it just worked out that way.
.
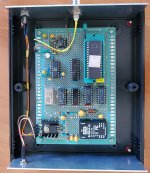
PCB is done (first time I ever used KiCAD, so was a bit of a learning curve - be kind with the feedback on everything I did wrong! :) ). Once built up and tested working , will publish all the files.
.
Screenshot 2023-07-23 163506.png
 
Back
Top