• Please review our updated Terms and Rules here

What did I do to my PDP-8 today.

He he.

You must be a hardware guy - always blaming the software :)!

Always start with the power rails.

I have had to recently make an order up so I could get free postage, so I bought some of those little digital voltmeters. I have a couple of OMNIBUS prototyping boards, so I was thinking of adding these Voltmeters to one ofvthe prototyping boards and making a little Voltage monitor board.

Dave
 
I bought some of those little digital voltmeters. I have a couple of OMNIBUS prototyping boards, so I was thinking of adding these Voltmeters to one of the prototyping boards and making a little Voltage monitor board.
dec-quad-extender-meters.jpg

I bought some of the +5cm (longer) DEC extenders from Retrocomp. My order of small DVM's from Aliexpress just arrived, so it looks like I should be able to mount 3 of the little DVM's on the socket connectors with double-sided tape or hot-melt glue. This should let me see +5, -15 and +15 voltage while debugging.
Please post a link to the DVMs from Aliexpress.
 
Last edited:
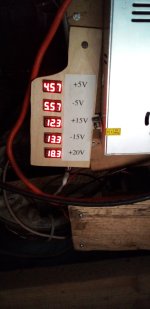
If you don't mind the lack of sign, you can just wire the meter for -15V "backwards". My PDP-11/45 came to me without a power supply (a blessing in disguise, I suppose), so I built a switcher for it. I got several of these meters, so that all the voltages read out on a single panel:

20230416_151508.jpg

... and perhaps surprisingly given that the voltages are all a bit off-spec, the machine runs happily :)
 
...

I was about to start swapping boards for my good spares when I thought I better first check the power rails on the H724A power supply. Surprisingly the -15V rail was about -0.8V and the power-good signal was about 0.1V. The 5V rail was good and the +15V rail was about +17V.

...

Finally I started checking the 6 ceramic capacitors (10 nF 100V) and the 1uF 35V electrolytic cap C2. As it turned out C3 was conducting at about 700 Ohm both in and out of circuit.

I replaced all 7 capacitors on the board A1. When I plugged the repaired board A1 back into the H724A and powered on, all the rail were back at their nominal value including the power-good signal.
About two years ago when I got my LAB-8/e I had to fix the power supply, but I forgot the details.
I got curious about it, but couldn't find anything about the problem in my LAB-8/e notes so I dug through the old Vcfed messages.
Message #2 in H724 power supply -15V instability (LAB-8/e) documents that the problem was caused by C19 on board A1 in the H724A power supply.
At the time I replaced all 10 nF caps of this type on both of the power supply regulator boards - A1 and A2.

If you have problems with voltage glitches or drift on a H724 or H724A power supply, I recommend as a first step to replace all the 10nF 100V ceramic caps which are in a glass body resembling diodes.
Modern through hole ceramic cap replacements are just a few cents each and replacement just takes a few minutes.
I go further to suggest, if you have to remove your H724(A) supply for any reason, then spend a few minutes to replace all the caps on boards A1 and A2 as these caps have failed on 2 out of 2 of my systems.
 
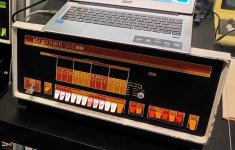
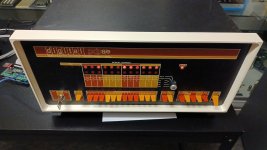
I got tired looking at the beaten up bezel of my PDP-8/e:

IMG_20221003_174858918.jpg

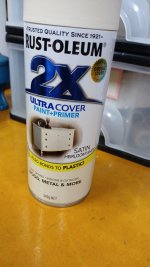
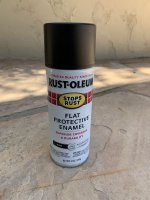
I went to the local hardware store to get some paint which looked to be similar enough to the DEC white:

IMG_20230417_180810116.jpg

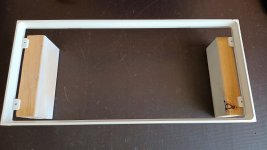
After spending a few hours cleaning off the old paint using paint stripper, steel wool and elbow grease I spray painted the bezel and let it dry for 72 hours:

IMG_20230419_114012409.jpg

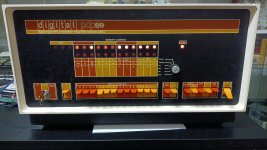
Here is how it looks after I re-installed the bezel:

IMG_20230421_002737755.jpg

IMG_20230421_002754603.jpg

The colour is close enough for me and it is more pleasing to look at (click on the thumb nails above to see the photos in full size).

Eventually I will deal with the case lid which cries out for a paint job too.

Tom
 
So it's now a smooth (satin) finish throughout; no longer that pebble texture (chipped and all, of course ...)?
For me it is close enough (but not quite 100% identical) to the good original finish on my LAB-8/e which has not much of a pebble texture.
Importantly it no longer looks as if I just dug it out from a garbage tip and my eyes no longer burn when I look at it. :)
Also it only cost me A$15.95 (about US$10.00) and a bit of time. I already had the paint stripper and the steel wool.
 
I got tired looking at the beaten up bezel of my PDP-8/e:

The colour is close enough for me and it is more pleasing to look at (click on the thumb nails above to see the photos in full size).

Wow, looks great! I need to do this too. My 8/L bezel is chipped but not quite as badly as yours before painting. 8/m has been painted but it's not quite the correct color.

I'll search out that exact brand, style, and Heirloom White color.
Eventually I will deal with the case lid which cries out for a paint job too.
I used this one to touch up the inside of the chassis and cover of the 8/m, and also the frame of the H740 supply.
IMG_9711.jpg
 
I got tired looking at the beaten up bezel of my PDP-8/e:

View attachment 1255803

I went to the local hardware store to get some paint which looked to be similar enough to the DEC white:

View attachment 1255799

After spending a few hours cleaning off the old paint using paint stripper, steel wool and elbow grease I spray painted the bezel and let it dry for 72 hours:

View attachment 1255800

Here is how it looks after I re-installed the bezel:

View attachment 1255801

View attachment 1255802

The colour is close enough for me and it is more pleasing to look at (click on the thumb nails above to see the photos in full size).

Eventually I will deal with the case lid which cries out for a paint job too.

Tom
That looks fantastic!!

-Chris
 
The colour is close enough for me and it is more pleasing to look at (click on the thumb nails above to see the photos in full size).

Tom

I ordered custom mixed low luster N 9.5 (Neutral Value Scale) DEC spray paint for the bezel on some PDP-8/a systems from myperfectcolor.com. It was about about $60 for three cans, and is probably the same color as the Rust-Oleum that you used.
 
Thanks for help here. So I was able to integrate the os8diskbootloader into BOOT. I took the long bootcode of os8diskserver and put it in bootv4.pa from OS/78.
You can find the code and a bootable floppy image here:

https://retrobyte.de/boot.sv.html

I testet it with simh only. Hope it will work with my 8/a also, but I will need some days to get there.

Volker
I'm reading through this whole thread, by way of coming up to speed and joining in.
I just looked at your site, retrobyte.de. NICE!
Thanks for the kind words about the v3d.rk05 image.
Note that in the time that's elapsed since your posting of 2019 August, I've done a lot more work.
You should pick up ock.rk05. It's the OS/8 Combined Kit built completely from source with all the goodies integrated that you liked from the v3d.rk05 image.
I continue to look for the two U/W FOCAL modules that will implement the floating point API without use of the EAE.

-Bill Cattey a.k.a. poetnerd
 
Fired up the 8/e to test Console Serial Disk with my new Raspberry pi 400. I have been waiting for the supply of Rpi's to recover. List on the 400 is still $70 but I paid $105 for this one. It looks like Rpis should be available again through the normal channels in the next couple of months. For people who don't know the 400 is a quad core 1.8 ghz processor with 4 gb of ram built into a little keyboard. Boots off of a micro sd card and is powered by a USB C port. There are two USB 3 and one USB 2 ports. There are two mini HDMI ports. Kind of reminds me of the days of the Commodore 64 where the computer is in the keyboard. Except that the computer in this keyboard is very powerful.

The Rpi400 is what I am going to recommend as the CSD server if you don't have an appropriate device already.

Seems to work fine which was expected but never a certainty.
 
Back
Top