• Please review our updated Terms and Rules here

Cromemco dazzler replica project

So

IC 43 pins 10, 13 & 14 all need connecting to the adjacent rail
IC 39 pin 14 needs connecting to the adjacent rail
IC 23 pin 10 needs connecting to the adjacent rail

Hugo, I notice in the image you sent me, that IC23 pin 10 is not connected ?

I have updated the Kicad PCB files but not yet produced Gerbers as its some time since I did it and can't remember the steps.

Gary, I was looking at your updated Kicad file and I see the fixes for Board 2. But on Board 1, IC23 - Pin 10 is still unconnected. Not sure if we are correcting this "original sin" or not ... ?
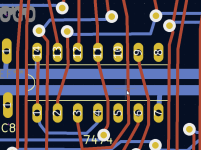
1708800780072.png
 
For some reason the earth pin has been made into a large hole for the gnd connection of the video output. On mine I used two pcb pins that are 0.9mm diameter and have an associated single socket pin which is for the gnd and video wire . These single socket pins are Jayar parts, but a 2 pin connector would be fine too.
A picture of this on yours would be really helpful when you get a chance

Also, the holes have not been made large enough in diameter (by the look of it) for the ceramic Xtal tuning capacitor (C17) pins. You can drill them out.
Holding the board, it looks like these holes are the exact same size as the XTAL itself, so I guess we'll see when that capacitor shows up.

Also on the edge connector area there should be a small taper to help it plug in to the socket, not a sharp square edge, but you can always add one by hand. If it is not there high force is required to get the card to plug in and it has a very abrupt entry.
Can I just use a hand file and gently chamfer the edges?
 
Last edited:
The progress is looking good. I can hardly wait for built-up board photos and final testing showing them working.

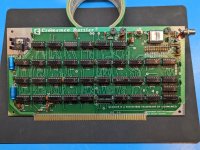
Already in progress - this is about as far as I can take it until my Mouser order arrives in a few days. And before anyone says "You should wait until you get ALL your components in, and solder lowest-profile parts first" - just know, I did carefully consider doing this. For about 2 seconds. But my impatience won out.

PXL_20240224_195328376~2.jpg

PXL_20240224_195541256~2.jpg

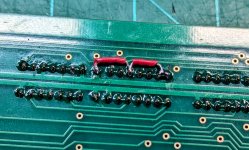
Already added the tiny fixes for Board 2:
PXL_20240224_195649186~2.jpg
 
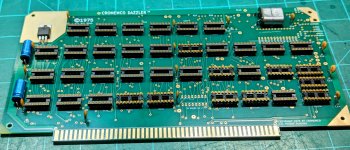
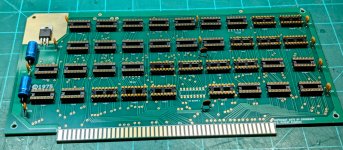
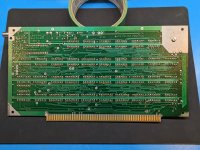
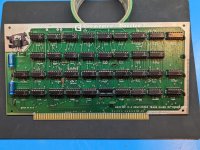
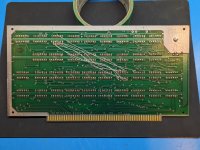
Here's some quick pics of my original Rev D boards.

@Gary C do you have the KiCad files you've been posting in this thread in Github also? Would be happy to spend a little time doing a couple PR's to improve the silk screen cosmetics a bit.

Dazzler Rev D Board 1 Front.jpg
Dazzler Rev D Board 1 Back.jpg

Dazzler Rev D Board 2 Front.jpg
Dazzler Rev D Board 2 Back.jpg
 
A picture of this on yours would be really helpful when you get a chance


Holding the board, it looks like these holes are the exact same size as the XTAL itself, so I guess we'll see when that capacitor shows up.


Can I just use a hand file and gently chamfer the edges?
I think the crystal holes are likely ok for the crystal wires, but the pins on C17 are substantially larger I cannot recall the exact size probably 1mm to 1.3mm I would guess, you can check when you get the part and enlarge the holes accordingly. I'll see if I can find what I specified them at on my pcb. They cleared the pins on the original part.

Yes, use a hand file.

Those wires on the original board were a bit of a mess, I did mine a little differently.

The original TMS3417 IC was in the early TI pacakage that were cut at the ends with a saw and they had ventilation holes in the pins too, just after they exited the IC body, though they may have just made it easier to form the pins, I'll attach a photo later, this package was like a T.Rex compared to what the DIL package and pins evolved into.
 
Last edited:
Already in progress - this is about as far as I can take it until my Mouser order arrives in a few days. And before anyone says "You should wait until you get ALL your components in, and solder lowest-profile parts first" - just know, I did carefully consider doing this. For about 2 seconds. But my impatience won out.

View attachment 1274197

View attachment 1274198

Already added the tiny fixes for Board 2:
View attachment 1274199
There needs to be enough space under the TO-220 voltage regulator heat tab, to fit the aluminium heat sink. Ideally the regulator is screwed down with that under it, in place, and then the pins soldered. If it is bent up now, and the heat sink put under it, when pushed flat it will make the hole in the tab move towards the pins, and go off center with respect to hole one in the pcb, but if there is enough clearance in the hole, with respect to the screw you will get away with it. Or you could release the pins from the holes and re-mount it.

It is getting harder to find genuine original 7805 5V regulators with the thick copper tab now, at least the major suppliers don't tend to have them. They now stock ones with very thin tabs that are intended for soldering to pcb's. I don't like these at all as the tab deforms in the area of the screw and it is not wonderful for the thermal bond. I generally buy vintage old stock with the standard thick tab from the bay.
 
There needs to be enough space under the TO-220 voltage regulator heat tab, to fit the aluminium heat sink. Ideally the regulator is screwed down with that under it, in place, and then the pins soldered. If it is bent up now, and the heat sink put under it, when pushed flat it will make the hole in the tab move towards the pins, and go off center with respect to hole one in the pcb, but if there is enough clearance in the hole, with respect to the screw you will get away with it. Or you could release the pins from the holes and re-mount it.
You're right, probably jumped the gun soldering those up before my heat sinks arrive, oh well I have plenty of them.
 
With a quick look on the Rev D layout, it seems that compared to Rev C it has included two of the changes which are mentioned in Appendix A of the Games Manual for Dazzler board 2:

Recommendation (1): R/C added between IC50-12 and IC67-6 (R31 270 ohms and C42 330 pf)
Recommendation (3): Connection from IC49-1 to IC57-12 re-routed to IC57-11

Recommendation (2) connecting S100-54 (EXT. CLEAR) to S100-75 (RESET) seems not to be implemented, which makes sense for me (who wants to have them permanently globally connected)
 
Gary, I was looking at your updated Kicad file and I see the fixes for Board 2. But on Board 1, IC23 - Pin 10 is still unconnected. Not sure if we are correcting this "original sin" or not ... ?

Ooops, cant believe I missed that one.

I have changed it

As to github. I can't log in at the moment as I need my mobile phone and I have left it at the museum. Will upload ASAP
 

Attachments

  • Dazzler.zip
    950.6 KB · Views: 5
Had some spare time, so thanks @hideehoo contributing the pictures I had some idea how the Rev D should look alike.

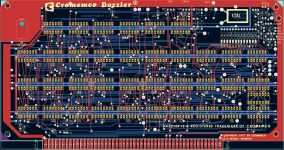
Here is the preliminary result for board #1

1709037532634.png


I updated mostly the silk screen on the front side, and the copper text on the back, based on Gary's latest post. Unfortunately, KiCAD seems not to support adjusting the letter spacing, so, although the Century Gothic font included in KiCAD is close to the font originally used for the PCB, the text length is shorter than in the original. For the more significant text parts and the logo I have used bitmaps. I did only cosmetical changes on the copper, so the connections should be the same (including IC23-10 being connected to the rail).

I am completely new to KiCAD, so probably there are 1000 ways to make it much better than I did. I'll post board #2 when being finished with it.
 

Attachments

  • Dazzler1 RevD.zip
    901.6 KB · Views: 2
If any PCBs/Gerbers are to be created using my files, please ensure the credits on the back to Hugo and Myself at the NWCM remain as placed please :)
 
Guess I found a workaround for the letter spacing problem. It worked out that the proper font is Futura (used on many S100 boards). The procedure is using that TTF font, increasing the letter spacing directly within the font with a font editor like FontForge, installing the new font in your system and assigning this font within KiCad. You however need that font installed when working with KiCAD. It will also be required when generating the gerbers. I have attached the TTF for the adjusted font, you can install it and then look after Futura Md BT in the KiCAD font selector. Also attached is the updated KiCAD file.
 

Attachments

  • FuturaBT-Medium-Spaced.zip
    24.9 KB · Views: 2
  • Dazzler1 RevD.zip
    1.2 MB · Views: 2
I don't have anything useful to add but the Futura font was apparently one of Stanley Kubrick's favourites: Typeset In The Future
Quite interesting. Here is another prominent example:

gedenktafel-mond.jpg
 
Guess I found a workaround for the letter spacing problem. It worked out that the proper font is Futura (used on many S100 boards). The procedure is using that TTF font, increasing the letter spacing directly within the font with a font editor like FontForge, installing the new font in your system and assigning this font within KiCad. You however need that font installed when working with KiCAD. It will also be required when generating the gerbers. I have attached the TTF for the adjusted font, you can install it and then look after Futura Md BT in the KiCAD font selector. Also attached is the updated KiCAD file.
What version of Kicad are you using ?

I get an error when trying to open them. I probably need to update.
 
Well, lets give the Aliens a road map to where we are, like the data supplied on Voyager. Everybody knows that the most important thing in the Universe is water.

It is not present in abundance on most planets, to support biological life, except the Earth, a unique blue gem in the Milky way.

So unique,the Earth, that if you were of a religious disposition, you may well conclude that a God created it.

Lets attract the Aliens here to Earth, so they can fight us for the water (they were not expecting we would throw iron man hole covers at their ships to perforate the hulls) .

Though, Humans are much more dangerous than any Aliens, I assure you, have a look at the Avatar movie. We see what we want and take it. In that sense, we are the Aliens.
 
Back
Top