• Please review our updated Terms and Rules here

Pacman tabletop trace repair

falter

Veteran Member
Joined
Jan 22, 2011
Messages
6,576
Location
Vancouver, BC
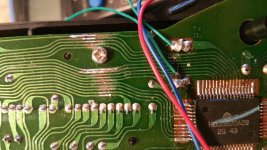
Not sure if these qualify as 'computers' per se.. but anyway, I have one of these Coleco Pacman table top units and have nursed it mostly back to health. However, during disassembly, because I didn't know of some hidden screws the board got bent and developed a hairline crack right through many traces. If I flex the board in just the right way everything lights up.

I'm looking for advice on best repair option. What I've tried doing with some success is sanding away the coating over the affected traces and then doing a tiny solder bridge. But it is tedious and because the traces are so small and packed so tight its hard to avoid crossing them.

I was thinking circuit trace pen.. but don't know if these are fine enough. Another way would be to run jumper wires.. but because these traces are so small and so tightly packed my eyes have a hard time following them from point to point. Anyway.. just looking for any advice from more seasoned pcb repair guys.
1454780943468.jpg
 
Hi Falter,

You need a glassfiber pencil to carefully rub the green lacquer and any oxidation from the traces, sanding with sandpaper might be just to coarse. Get some small amount of special electronic soldering flux (not the stuff used for copper tubing!).
Just wet the area where you want to solder (on and around the traces) with the flux and the just apply a small layer of solder onto the traces. You will find that the flux will help tremendously in avoiding shorts and getting the solder right where you need it.
You can also try and solder a single strand of wire from a piece of flatcable over the gap, also again with the flux, you will find it almost settles itself into the solder. Might take some practice.


Good luck!
 
Thanks!

I think my challenge is how tight and tiny the traces are.. I'm having a hard time avoiding solder making contact with solder on other traces.
 
If they're really small, the best way is to use wire from the point where the trace meets a solder point on the board. I have a huge pile of wirewrap wire that I used for cases like this.

Also, if the trace leads off to a spot on the board where there aren't any surrounding traces, what I usually do is take an exacto knife, scrape the green coating off, solder the trace, and attach the wire there.
 
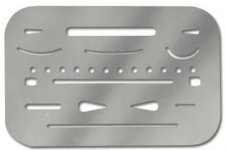
I knew a guy years agothat would use the trace pen but with a architects erasing shield to help with the smaller size of the traces. Since they look to be almost straight in the photo it probably worth giving it a try. Repaired a cracked 1541 board after I dropped it on the floor.

stainless-steel-erasing-shield-polished-4.jpg
 
yeah, I would also remove the masking with something like a fiberglass pen or xacto knife, apply flux to the traces on either side of the break and tin it with the iron. Damaged traces that are still butted up agiainst eachother should bridge back together, otherwise I would take a small length of wire wrap with the insulation removed, place it over the break and solder it down.
 
+1 for NeXT's solution above.

If you are having difficulty seeing the traces on a PCB (as I am finding these days) you may have to invest in a head-mounted magnifying glass and LED light. That's my next purchase from the store...

Dave
 
Also, you'll need to reinforce the cracked PCB to keep it from flexing in the crack area, or you run the risk of destroying your work. Some cyanoacrylate ("super") glue wicked into the crack, allowing it to cure should take care of that.
 
NeXT and Chuck(G) are both spot-on with their suggestions. :)

Edit: (And Daver2 even though I REFUSE to admit I'm getting older) ;)
 
Last edited:
Back
Top